View & Edit Students: Overview
Use the View & Edit screens to search and view information for an individual student including the student’s profile information.

Figure 1. View & Edit Students
To access the View & Edit Students screen, select the [Students] navigation tab in the navigation bar (figure 1).
The following links provide information about searching, viewing, or editing a student’s profile:
- Search for a Student—Obtain help on how to search for an individual student.
- Student Profile—Demographics—View the demographic information for an individual student.
- Student Profile—Test Assignments—Use the [Test Assignments] tab to view the list of assessments for which a student is currently registered. This tab can also be used to add or remove a test assignment.
- Student Profile—Test Settings—Use the [Test Settings] tab to view or edit student test settings and accessibility resources.
- Student Profile—Unlisted Resources—Use the [Unlisted Resources] tab to add, view, or edit unlisted resources from a pre-identified list or to request other unlisted resources for a student.
- Student Profile—Testing Status—Use the [Testing Status] tab to view the testing status for all tests assigned to the student as well as demographic changes.
- Student Profile—Score Status—Use the [Score Status] tab to view the score status of each test that is assigned to the student as well as a list of Appeals entered for this student.
- Student Profile—Reporting—Use the [Reporting] tab to view a student's score reporting options.
Search for a Student
Use the View & Edit Students screen to search for and view an individual student’s demographic information.
- Enter information using the standard search criteria and select the [Search] button (figure 2). A list of students matching the search terms is displayed. If no search terms are entered, a list of students associated with the current user’s organization is displayed.
-
To clear all the search terms and start over, select the [Clear] button.
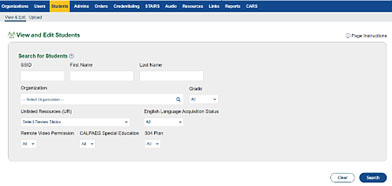
Figure 2. “Search for Students”
A list of all students whose demographic information matches the search terms entered is displayed in the results area (figure 3). If no search terms are entered into any field, the search results show a list of all students.
- Select the [View] magnifying glass [
 ] icon to the right of a student’s name to view that student’s information. The student’s details are displayed on the View & Edit Students screen, under the [Demographics] tab.
 - Select the [Unlisted Resources] form [
 ] icon to view the details of the unlisted resources for the student.
The Unlisted Resources field displays the status of an unlisted resource associated with the student, if applicable.
- The [Approved] green check mark [
 ] icon is displayed when the unlisted resource has been approved.
 - The [Submitted] orange check mark [
 ] icon is displayed when the unlisted resource has been assigned but is not yet approved.
 -
The [Unlisted Resources] form [
 ] icon is displayed when the student has been assigned an unlisted resource.
Figure 3. “Search for Students” Results
Student Profile—Demographics Overview
The [Demographics] tab displays detailed information about the student selected, including SSID, responsible LEA and school, grade, date of birth, and primary language. Additional information, such as EL status and ethnicity, is displayed as well.
Screen Information
Figure 4 displays the top portion of the [Demographics] tab. Select the corresponding tab to move to other information about the student’s profile available here, which is:
- Test Assignments
- Test Settings
- Unlisted Resources
- Score Status
-
Reporting

Figure 4. [Demographics] Tab—Top Portion
The fields displayed on the [Demographics] tab are organized in two sections: “Details” and “Additional Information.” The “Details” section lists current information regarding school, grade, and other general information. The “Additional Information” lists EL status, ethnicity, disability, and special education information.
The “Details” section compares CALPADS information to the testing information in TOMS. Coordinators should check this information to ensure that students are reported properly for testing.
Locked Fields
If the LEA needs to unlock the “for testing” fields to change student information (such as, if a student taking a general assessment is suddenly assigned an IEP to take an alternate assessment), the student should stop testing. The LEA or school must then file a STAIRS case, update the data in CALPADS, and then submit the Appeal.
The following fields are locked at the time of the student’s first CAASPP or Summative ELPAC testing start event:
- Date of Birth
- Grade Assessed
- Primary Disability Type for Testing
- IDEA Indicator for Testing
- SED Status for Testing
In addition to the fields listed previously, the following fields are also locked at the time of the student’s first Summative ELPAC testing start event:
- ELAS for Testing
- Primary Language for Testing
Student Profile—Test Assignments Overview
Use the [Test Assignments] tab to view or edit the current test assignments for a student as well as some of the student's demographic information as recorded in CALPADS.
Be aware of these important points about using the student test assignment function in TOMS:
- Student test assignments do not carry over from year to year in TOMS.
- Student data in CALPADS, including data in education programs (e.g., the special education or the Section 504 plan program), must be kept current to ensure that students remain eligible to take the correct assessment with the appropriate settings.
- Any changes to a student’s CAASPP test assignments will be reflected in TOMS on the day following the requested change.
- The Test Assignment Status column displays “In Progress” until the test assignment is processed.
- Once the test assignment has been processed, the Test Assignment Status displays “Assigned.”
- The Last Updated Date column displays the date and time of the last change to the test assignment. Users should add two days to the displayed date to schedule testing.
The following links provide more information about student test assignments:
- View or Edit CAASPP Test Assignments
- Add or Remove Additional CAASPP Test Assignments
- Assign or Remove a Student Exemption (for a CAASPP test assignment)
- View or Edit ELPAC Test Assignments
- Add or Remove an Alternate ELPAC Test Assignment
- Edit ELPAC Test Assignment Domain Exemptions
CAASPP Test Assignments
Use the [Test Assignments] tab of the View & Edit Students screen (figure 5) to do any of the following tasks:
- Search for a student (to view the list of current CAASPP test assignments for the student and for details about finding a specific student)
- Add or remove additional CAASPP test assignments for the student
- Assign or remove a student exemption for a CAASPP test assignment
- Edit a student’s remote testing video permission
Table 1 describes the columns included in the Current Active Test Assignments table.
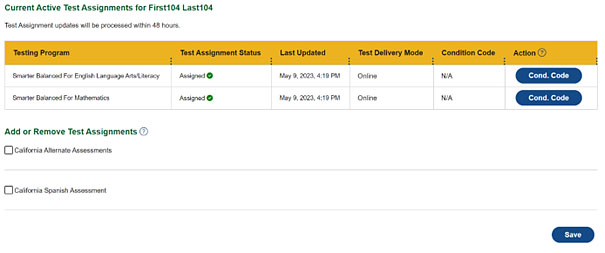
Figure 5. CAASPP Current Active Test Assignments
| Column | Description |
|---|---|
| Testing Program | The testing program for the current active test assignment (This field is view only.) |
| Test Assignment Status | The status of the current active test assignment (The status can be only “In Progress” or “Assigned.” This field is view only.) |
| Last Updated | The date and time the test assignment was last updated |
| Test Delivery Mode | The test delivery mode (This field is view only.) |
| Condition Code | A condition code of NTE or PGE—if a condition code has been saved for the test assignment |
| Action | The [Cond. Code] button, which can be used to assign or remove condition codes for a selected test |
Add or Remove Additional CAASPP Test Assignments
Take the following steps to add or remove an additional CAASPP test assignment for the student:
-
From the “Add or Remove Test Assignments” section (figure 6) of the [Test Assignments] tab, select or deselect the checkbox for the corresponding test to assign or unassign an additional test for the student.
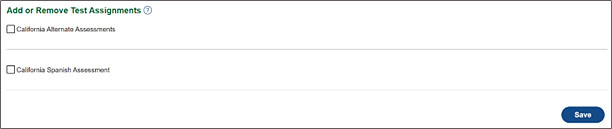
Figure 6. Add or Remove Test Assignments
- Select the [Save] button (figure 7) to save the changes to the test assignments.
- Select [Yes, Save Test Assignments] to save the changes.
-
Select [Cancel] to close the message without saving.
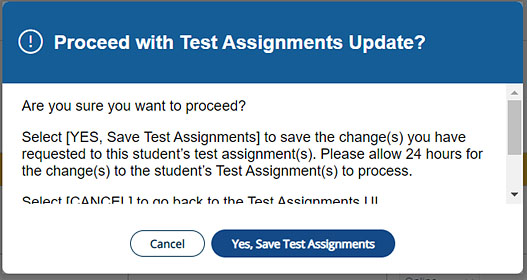
Figure 7. Save Test Assignments
-
Select the [Close] button to close the confirmation message (figure 8).
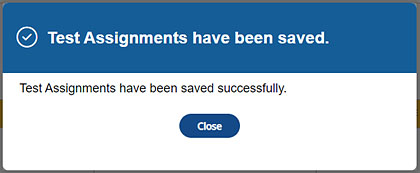
Figure 8. Assignments Saved
Assign or Remove a Student Exemption
A student may be exempted because of a significant medical condition or parent or guardian exemption:
- A "Significant medical emergency" is a significant injury, trauma, or illness (mental or physical) that precludes a pupil from taking the achievement tests. An injury, trauma, or illness is significant if the pupil has been determined by a licensed physician to be unable to participate in the tests.
- A parent or guardian may annually submit to the school a written request to excuse his or her child from any or all parts of any test provided pursuant to California Education Code Section 60640 for the school year. If a parent or guardian submits an exemption request after testing has begun, any test(s) completed before the request is submitted will be scored and the results reported to the parent or guardian and included in the pupil's records. An LEA and its employees may discuss the CAASPP assessment system with parents and may inform parents of the availability of exemptions under California Education Code Section 60615. The LEA and its employees shall not solicit or encourage any written exemption request on behalf of any child or group of children.
Take the following steps to enter a student exemption for a CAASPP test assignment:
-
In the Action column, select the [Cond. Code] button (figure 9).
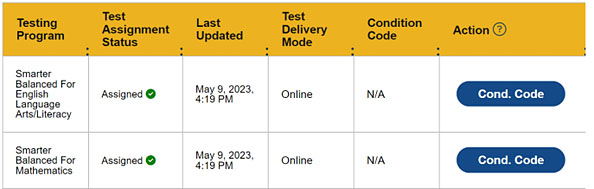
Figure 9. Test Assignments with Condition Code
- The Select Condition Code pop-up box is displayed:
- Select a condition code from the Select Condition Code drop-down list. If a condition code has already been entered and needs to be removed, select the “blank” space from the drop-down list. The following values are available:
- Blank—No condition code is assigned
- NTE—Not tested due to significant medical emergency
- PGE—Not tested due to Parent/Guardian exemption
- Select a condition code from the Select Condition Code drop-down list. If a condition code has already been entered and needs to be removed, select the “blank” space from the drop-down list. The following values are available:
- To save the selection, select the [Save] button, and then select the [Close] button.
- To cancel, select the [Cancel] button.
Edit Remote Testing Video Permissions
To edit the remote testing video permissions for a CAASPP test assignment, toggle the value of the Remote Testing Video Permission field (figure 10).
- The default selection is “No” and indicates that the student does not have parent/guardian permission to be monitored via the student’s camera during the remote testing administration. Students with a value of “No” will not be allowed to participate in a remote administration for which video monitoring is required.
- Select “Yes” to indicate that the student has parent/guardian permission to be monitored via the student’s camera during the remote testing administration. This field must show “Yes” for a student to take part in a remote test administration for which video monitoring is required.

Figure 10. Remote Testing Video Permission
ELPAC Test Assignments
Use the [Test Assignments] tab of the View & Edit Students screen (figure 11) to do the following:
- View the list of current ELPAC assignments for the student (For details about finding a specific student, refer to Search for a Student.)
- Add or remove the Alternate ELPAC Test Assignment
- Edit ELPAC test assignment domain exemptions
- Edit a student’s remote testing video permission
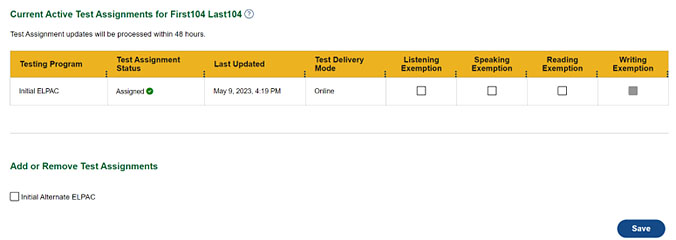
Figure 11. Current ELPAC Test Assignments
Add or Remove Alternate ELPAC Test Assignment
Registration for the Summative ELPAC is created automatically on the basis of eligibility requirements. Users can change an eligible student’s test assignment from Summative ELPAC to Alternate ELPAC using the “Add or Remove Test Assignments” section of the [Test Assignment] tab.
Users can designate domain-level exemptions for the Initial ELPAC. For the Summative ELPAC, only domain exemptions can be designated. Domain exemptions cannot be designated for the Initial Alternate ELPAC or Summative Alternate ELPAC. Assignment of the Alternate ELPAC to the student, replaces the default assignment of the Summative ELPAC.
To be eligible for the Alternate ELPAC, a student must be an EL student whose IEP team has designated the use of an alternate assessment and must have an IDEA indicator of “Yes” from CALPADS.
Eligibility for the Alternate ELPAC will then be determined for students with an alternate assessment for whom each of the following applies:
- ELAS (ELAS = EL)
- Primary language code (PLC) is other than English or American Sign Language (ASE)
- Age is under twenty-two years
-
From the “Add or Remove Test Assignments” section (figure 12) of the [Test Assignments] tab, select or deselect the checkbox for the corresponding test to assign or unassign the Alternate ELPAC for the student.

Figure 12. Add or Remove Test Assignments
- The Test Assignment pop-up is displayed (figure 13).
-
Select [OK] to dismiss the pop-up.
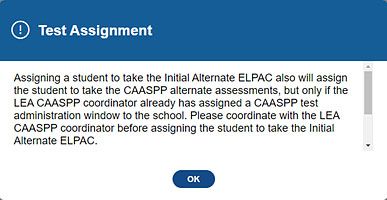
Figure 13. Save Test Assignment
-
- Select the [Save] button to save the changes to the test assignments (figure 14).
- Select [Yes, Save Test Assignments] to save the changes.
-
Select [Cancel] to close the message without saving.
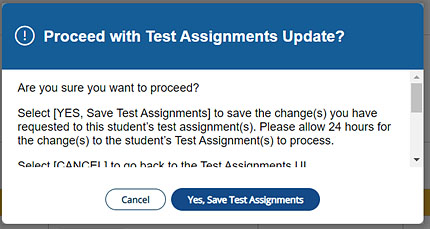
Figure 14. Save Test Assignments
-
Select the [Close] button to close the confirmation message (figure 15).
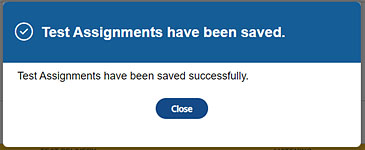
Figure 15. Assignments Saved
Edit ELPAC Test Assignment Domain Exemptions
Use the “Current Test Assignments” section of the [Test Assignments] tab to select or deselect domain exemptions for the student.
Selections for domain exemptions for both the domains in the same composite are not allowed. The composites are the following:
- Oral language composite: Listening and Speaking domains
- Written language composite: Reading and Writing domains
Domain exemptions are not available for the Alternate ELPAC.
To assign or remove domain exemptions for the Summative ELPAC test assignment, select or deselect the checkbox in the corresponding domain column (figure 16).
- To save the selection, select the [Save] button (figure 17), and then select the [Yes, Save Test Assignments] button (figure 18).
-
To cancel the selection, select the [Cancel] button.

Figure 16. Current Active Test Assignments
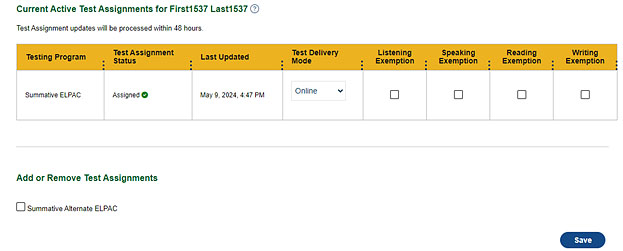
Figure 17. Completed Test Assignments
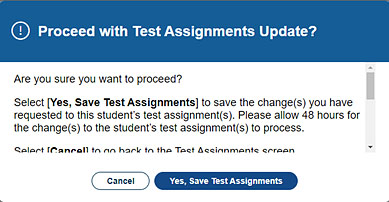
Figure 18. Save Test Assignments
Edit a Student’s Remote Testing Video Permission
To edit the remote testing video permissions for an ELPAC test assignment, toggle the value of the Remote Testing Video Permission field (figure 11).
- The default is “No” and indicates that the student does not have parent/guardian permission to be monitored via the student’s camera during the remote testing administration. Students with a value of “No” will not be allowed to participate in a remote administration for which video monitoring is required.
- Select “Yes” to indicate that the student has parent/guardian permission to be monitored via the student’s camera during the remote testing administration. This field must show “Yes” for a student to take part in a remote test administration for which video monitoring is required.
Student Profile—Test Settings Overview
Use the [Test Settings] tab to view or edit student test settings and accessibility resources.
- Student test settings must be reestablished each administration year.
- Student test settings should not be changed after a student has begun testing. If test settings need to be changed after a student has begun testing, an incident case may need to be filed in STAIRS.
- For the Initial ELPAC, for which the LEA has 30 days to test the student, the LEA will have to pause the test, file a STAIRS case, and then change the test settings.
- Accommodations and designated supports are available to a student only when determined for use by an educator or team of educators (with parent/guardian and student input, as appropriate) or specified in the student’s IEP or Section 504 plan.
- Accommodations and designated supports must be permitted on CAASPP and ELPAC tests to all eligible students if specified in their IEP or Section 504 plan.
- Columns of note on the screen are as follows:
- The Last Updated Date column displays the date and time of the last change to the student’s test settings.
- The Last Updated User column displays the name of the user who submitted the last change to the student’s test settings.
- The Last Updated Source column displays the means by which the test settings were changed.
- Submit student test settings one of four ways:
- Changing information for a specific student directly in the Student Profile (displayed as “UI,” for “user interface,” in the Last Updated Source column)
- Downloading, editing, and then uploading the test settings template with data for multiple students within the LEA (displayed as “Upload” in the Last Updated Source column)
- Using the ISAAP Tool (displayed as “Upload” in the Last Updated Source column)
- Having the LEA’s SIS vendor use the Test Settings API to submit student data directly into TOMS (displayed using a value selected by the LEA’s SIS vendor in the Last Updated Source column)
The following subsections provide more information:
CAASPP Test Settings Overview
For the CAASPP, accommodations and designated supports can be assigned for the following assessments, depending on the student’s test assignments:
- Smarter Balanced ELA
- Smarter Balanced Mathematics
- CAST
- CSA
- CAA for ELA
- CAA for Mathematics
- CAA for Science
Please note that not all supports are applicable for all assessments. Refer to the Types of Resources subsection in the CAASPP and ELPAC Accessibility Guide.
Edit CAASPP Test Settings for a Specific Student
If the student has a Special Education or Section 504 Plan setting of “Yes,” use the corresponding section to edit accommodations and designated supports for a specific student. For information on searching for an individual student, please refer to Search for a Student.
Figure 19 shows the information displayed in the “Embedded Accommodations” section. The “Non-Embedded Accommodations” and “Embedded and Non-Embedded Designated Supports” sections are displayed in TOMS after the “Embedded Accommodations” section and are in a similar format.
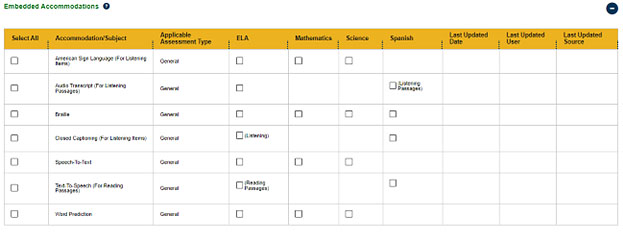
Figure 19. Embedded Accommodations
To assign the accommodation or support, in the Select Accessibility Resource column, select the checkbox associated with the accommodation. The checkbox of each applicable test assigned to the student becomes selected.
- Select the [Update] button to save the selected accommodations and designated supports.
- To confirm and save the test settings, select the [Close] button.
ELPAC Test Settings Overview
For the ELPAC, accommodations and designated supports are assigned for the following assessments, depending on the student’s test assignments:
- Initial ELPAC
- Initial Alternate ELPAC
- Summative ELPAC
- Summative Alternate ELPAC
Please note that not all supports are applicable for all assessments. Refer to the Types of Resources subsection in the CAASPP and ELPAC Accessibility Guide.
Edit ELPAC Test Settings for a Specific Student
If the student has a CALPADS Special Education or Section 504 Plan setting of “Yes,” use the corresponding section to edit test settings for a specific student. For information on searching for an individual student please refer to Search for a Student.
Figure 20 shows the information displayed in the “Embedded Accommodations” section. Figure 21 shows the information displayed in the “Non-Embedded Accommodations” section. The “Embedded and Non-Embedded Designated Supports” section is displayed in TOMS after the “Non-Embedded Accommodations” section and is in a similar format.
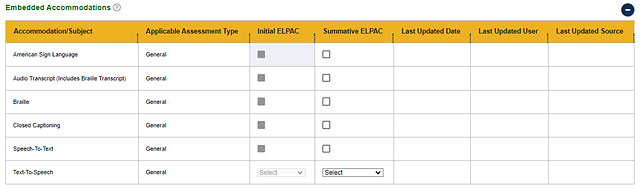
Figure 20. Embedded Accommodations for the ELPAC
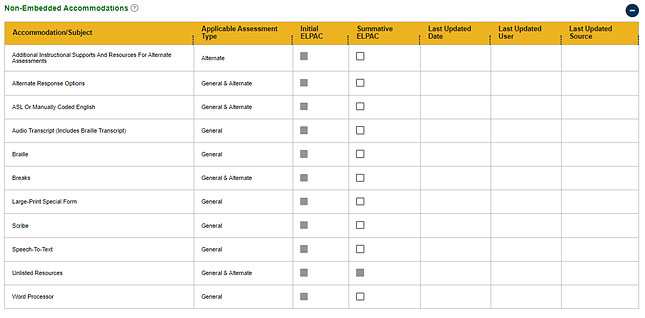
Figure 21. Non-Embedded Accommodations for the ELPAC
To assign the accommodation or designated support for a test assignment, select the checkbox associated with the accommodation in the corresponding test’s column.
For accommodations that include a drop-down list, select the appropriate value from the list. Then do the following:
- Select the [Update] button to save the selected accommodations and designated supports.
- To dismiss the popup, select the [Close] button.
Student Profile—Unlisted Resources Overview
Use the [Unlisted Resources] tab to view, edit, or add unlisted resources from a preapproved list or request other unlisted resources for a student.
Unlisted resources are not universal tools, designated supports, or accommodations. They are instructional supports identified in a student’s IEP or Section 504 plan that are regularly used by the student in daily instruction or on assessments but have not been previously classified as a universal tool, designated support, or accommodation.
The CDE will approve the use of other unlisted resources on the basis of the IEP or Section 504 plan team’s designation, and if the unlisted resource does not compromise the test’s integrity or security. Accommodations and designated supports are available to a student only when determined for use by an educator or team of educators (with parent/guardian and student input, as appropriate) or specified in the student’s IEP or Section 504 plan.
The California Assessment Accessibility Resources Matrix includes a list of unlisted resources that already have been identified as resources that change the construct of the assessment.
For accessibility resources that are required by a student’s IEP but are not included in the California Assessment Accessibility Resources Matrix, LEA and test site coordinators may submit a request for other unlisted resources to the CDE for approval by selecting the [Add Other Unlisted Resources] button from the [Unlisted Resources] tab.
For the CAASPP, test results for a student for whom an approved unlisted resource changed the construct of what was being tested are not considered valid for aggregation of scores. The student will receive a score report with a footnote that the test was administered under conditions that resulted in a score that may not be an accurate representation of the student’s achievement. These results are not included in the aggregations on the Test Results for California’s Assessments website and are considered as “not tested” or “not participating” for the California Accountability Dashboard.
For the ELPAC, the student will receive the LOSS for the affected domain when approved unlisted resources changed the construct of what was being tested. The student will receive a score report with a footnote that the test was administered under conditions that resulted in a score that may not be an accurate representation of the student’s proficiency level. However, the student’s test results will still be used for aggregation of scores.
For more information on either of the following, select a link:
Figure 22 shows information included in the top of the [Unlisted Resources] tab.
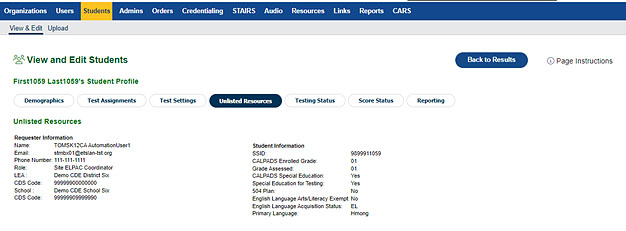
Figure 22. Unlisted Resources—Top of Screen
CAASPP Unlisted Resources Overview
Request Unlisted Resources for CAASPP
The [Unlisted Resources] tab contains a table from which users can select one or more preapproved, non-embedded, unlisted resources for a student’s test assignment (figure 23). This table lists the available resources for each test for which the student is registered. If the unlisted resource listed in the left column of the table is available for a test, a checkbox is displayed under the column for the corresponding test. The unlisted resource is not available for tests with table cells that are grayed out.
The table can include the following tests, one per column, depending on the student’s test assignments:
- Smarter Balanced Mathematics
- Smarter Balanced ELA (Reading, Writing and Listening)

Figure 23. Unlisted Resources Testing Program Selection—CAASPP
For step-by-step instructions about how to request pre-identified non-embedded unlisted resources, refer to the Assign Pre-identified Non-embedded Unlisted Resources (CAASPP and ELPAC) subsection.
ELPAC Unlisted Resources Overview
For ELPAC, the student will receive the LOSS for the affected domain when an approved unlisted resource changes the construct of what is being tested. However, the student’s test results will still be used for aggregation of scores.
Request Unlisted Resources for ELPAC
On the [Unlisted Resources] tab, users can select the student’s testing program to access the Unlisted Resources tables. The Testing Program list displays only the assessments assigned to the student (figure 24).
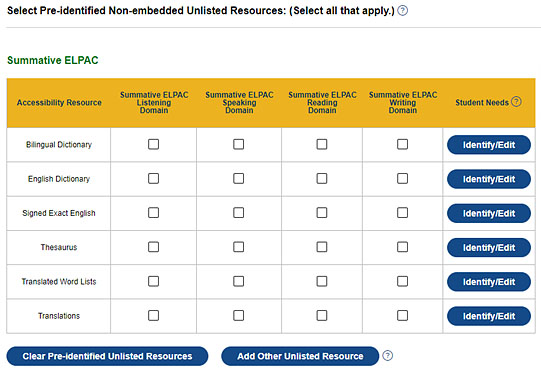
Figure 24. Unlisted Resources Testing Program Selection—ELPAC
The [Unlisted Resources] tab contains one or more tables from which users can select one or more preapproved, non-embedded, unlisted resources for a student’s test assignment (figure 24). One table per student test assignment is displayed, depending on the student’s test assignments.
- Initial ELPAC
- Summative ELPAC
Each table lists the available resources for the test by domain. If the unlisted resource listed in the left column of the table is available for the test’s domain, a checkbox is displayed under the column for the corresponding test domain. If the corresponding table cell is grayed out, the resource cannot be assigned to the student.
If the student does not yet have a test assigned, the table is not displayed for that test.

Figure 25.Other Unlisted Resources for the ELPAC
For instructions about how to request pre-identified non-embedded unlisted resources, refer to the Assign Pre-identified Non-embedded Unlisted Resources (CAASPP and ELPAC) section.
Assign Pre-identified Non-embedded Unlisted Resources (CAASPP and ELPAC)
Follow these steps to assign pre-identified, non-embedded unlisted resources for a either a CAASPP or ELPAC student:
-
Select the corresponding checkbox for each pre-identified, non-embedded unlisted resource needed for the student. Figure 26 displays the Pre-Identified Non-embedded Unlisted Resources Table for CAASPP and figure 27 displays the Pre-Identified Non-embedded Unlisted Resources Table for ELPAC.
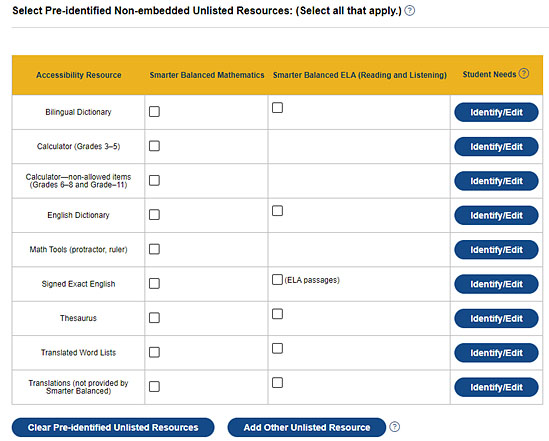
Figure 26. Pre-Identified Non-embedded Unlisted Resources Table—CAASPP

Figure 27. Pre-Identified Non-embedded Unlisted Resources Table—ELPAC
- Select the [Identify/Edit] button from the Student Need” column to assign the student needs for the selected resource. This is required. From the “Student Needs” pop-up box, select all that apply and then:
- [Cancel]—To close the pop-up box without saving changes
- [Clear]—To remove all selections
- [OK]—To save the selections and close the pop-up box
- To add resources that were not included in the Predefined and Non-Embedded table, or to assign resources for the alternate assessments, select the [Add] button (figure 26). Refer to the Request Other Unlisted Resources (CAASPP and ELPAC) section for details.
Request Other Unlisted Resources (CAASPP and ELPAC)
Before submitting a request for an unlisted resource, be sure to verify that the resource you want to request is not already listed in the California Assessment Accessibility Resources Matrix and allowed as part of the CAASPP and ELPAC for 2024–25. Follow these steps to assign resources that were not included in the Predefined and Non-Embedded table for either a CAASPP or ELPAC student:
-
To add resources that were not included in the Predefined and Non-Embedded table, select the [Add Other Unlisted Resource] button (figure 28).

Figure 28. [Add Other Unlisted Resource] button
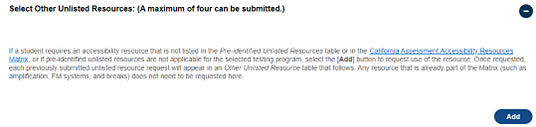
Figure 29. “Select Other Unlisted Resources”
- Once a request for another unlisted resource has been saved, the “Select Other Unlisted Resources” section (figure 30) displays the list of other unlisted resources not included in the first table and the list of resources for use on the either the CAAs or the Initial Alternate ELPAC by the student. In the following displayed sample, one request for “Other Unlisted Resources” has been submitted for this student. Up to four other unlisted resources can be assigned for the student.
-
Select [Add] to make a request for any of these resources.
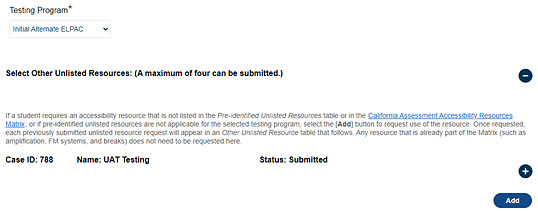
Figure 30. Other Unlisted Resources
-
-
The Add/Edit Other Unlisted Resources screen (figure 31 and figure 32) is displayed where the request for these other resources can be selected.
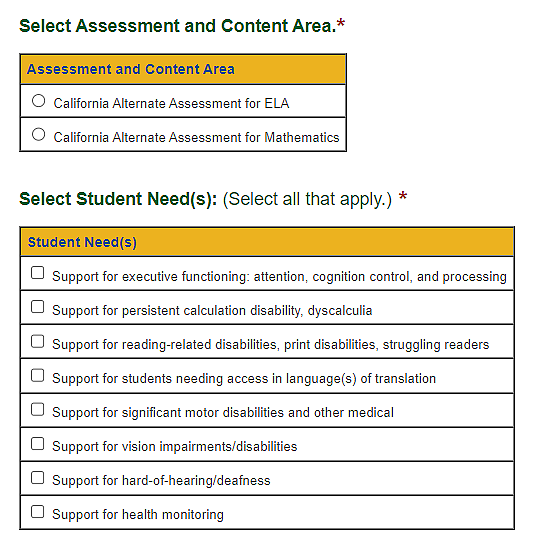
Figure 31. Add/Edit Other Unlisted Resources—CAASPP
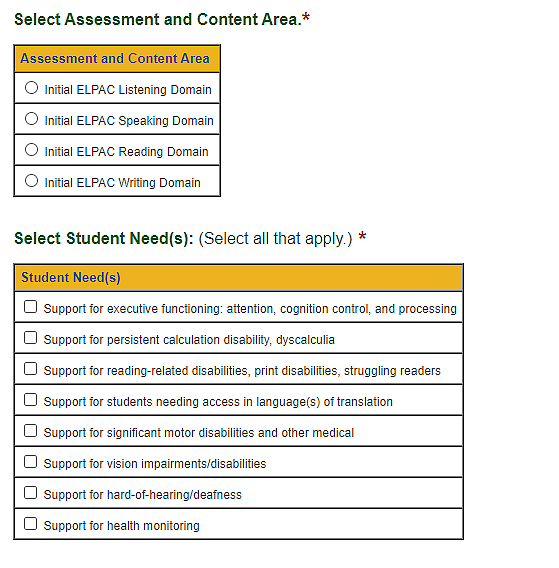
Figure 32. Add/Edit Other Unlisted Resources—Initial ELPAC
-
In the “Select Assessment and Content Area” section of the Add/Edit Other Unlisted Resources screen, select the assessment and content area that applies (figure 33 through figure 35).
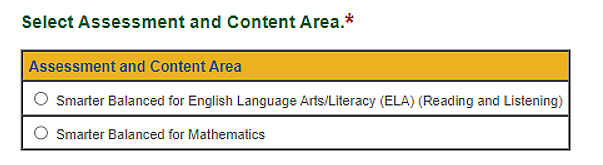
Figure 33. Select Assessment and Content Area—CAASPP
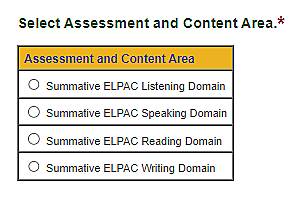
Figure 34. Select Assessment and Content Area—Summative ELPAC
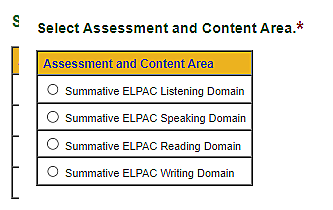
Figure 35. Select Assessment and Content Area—Initial ELPAC
-
In the “Student Need(s)” section of the Add/Edit Other Unlisted Resources screen, select all the student needs that apply (figure 36).

Figure 36. Select Student Needs
-
In the “Information Regarding Unlisted Resources” section of the Add/Edit Other Unlisted Resources screen, enter all the information for the questions (figure 37).
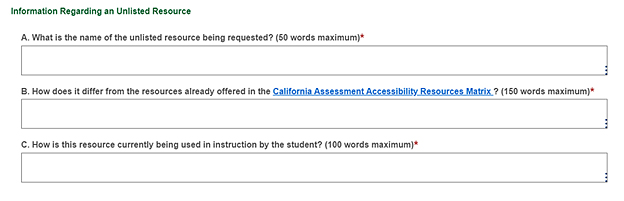
Figure 37. Information Regarding Unlisted Resources
- If the resource includes printed materials, such as a graphic organizer, use the “Upload Supporting Documents” section of the Add/Edit Other Unlisted Resources screen to attach supporting documents to the request for “Other Unlisted Resources” (figure 38). Do not upload the student's IEP or other confidential information.
-
In the Select File to Upload field, select the [Browse] (Edge or Firefox) or [Choose File] (Chrome) button to navigate to the location—on the local device—of the file, and then select the file. Select the [Upload] button to attach the document to the request.

Figure 38. Uploading Supporting Documents
Please read the following important information regarding uploading supporting documents:
- All file formats can be uploaded and there is no limit to the size of the file or the number of files that can be uploaded.
- All uploads are included on one page.
- Once the request is submitted documents can no longer be uploaded or deleted from the request until it has been reviewed with a status of “Additional Information Required”.
- Once documents are uploaded to the request, the [Unlisted Resources] tab displays a “Yes” in the “Document Uploaded” field of the Case ID table located in the “Select Other unlisted Resources” section.
- All uploaded supporting documents are displayed in a table in the “Upload Supporting Documents” section of the Add Other Unlisted Resources screen (figure 39).
- Select the download [
 ] icon to download the supporting document to your device.
 -
Select the trash can [
 ] icon to remove the supporting document from the request.
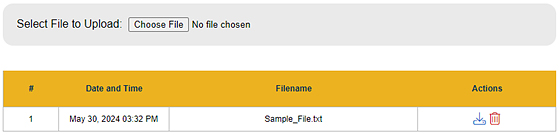
Figure 39. Upload Supporting Documents
- Select the download [
- Use the “Notes” section of the Add Other Unlisted Resources screen (figure 40) to chat with the reviewer about the request. Add additional notes as needed when submitting the request. The reviewer can respond to the note when reviewing the request.
-
To enter a note, simply enter the note in the text box and then select the [Add Notes] button. All notes relevant to the request are displayed most recent to oldest.
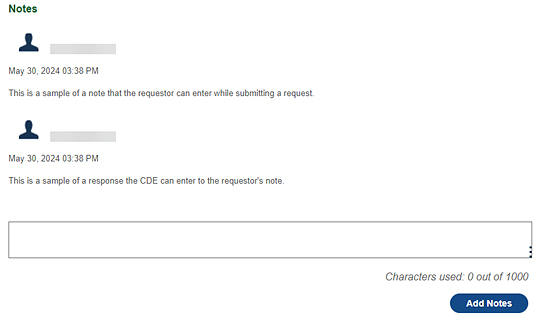
Figure 40. Notes
Please read the following important information regarding notes for the request:
- Notes can be added by the requestor, LEA coordinator, or CDE.
- Once the request is submitted the Notes feature is disabled for the requestor unless the CDE provides a status of “Additional Information Required.” In that case, the entire “Add or Edit Other Unlisted Resources” screen is again editable, including the Notes field.
- When a note is added, an email notification is sent to the requestor, LEA coordinator, and CDE users.
- If an LEA coordinator (or higher-level role, except for CDE) adds the note, the email is sent to all LEA coordinators and all CDE users.
- If a site coordinator adds a note, the email is sent to all site coordinators, all LEA coordinators, and all CDE users.
- If a CDE user adds the note, the email is sent to all LEA coordinators only.
- Once notes are added to the request the [Unlisted Resources] tab displays a “Yes” in the “Notes” field of the Case ID table located in the “Select Other unlisted Resources” section.
- Once the request for “Other Unlisted Resources” is completed, do one of the following:
- Select [Cancel] to close the Add Other Unlisted Resources screen without saving the changes.
- Select [Save] to save the changes, close the Add or Edit Other Unlisted Resource screen and display the Other Unlisted Resource screen.
-
After saving the request for other unlisted resources you must submit the request using the buttons located at the bottom of the [Unlisted Resources] tab (figure 41). This step will submit the entire request including the requests for pre-identified non-embedded unlisted resources and other unlisted resources.
- Use one of the buttons at the bottom of the screen to finish:
- Select [Cancel] to close the pop-up box without saving the changes.
- Select [Make Inactive] to inactivate any previously submitted or approved unlisted resources.
- Select [Save For Later] to save the request and be able to return to it later.
-
Select [Submit] to submit the completed request.
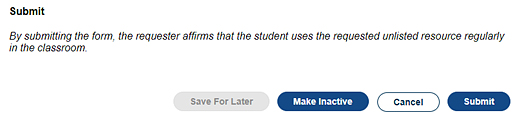
Figure 41. Submission of Unlisted Resources
- After the entire request has been submitted and the request for Other Unlisted Resources has been reviewed, the “status” is displayed in the “Select Other Unlisted Resources” section of the [Unlisted Resources] tab and can be one of the following (figure 42 and figure 43).
- Draft—indicates the request has been saved in draft status. The request can still be updated in this status.
- Submitted—indicates the request has been submitted. The request cannot be updated by the requestor in this status. It is locked until the reviewer provides an updated status.
- Additional Information Required—indicates the reviewer has requested additional information. The request can be updated by the requestor and then resubmitted for approval.
- Approved—indicates the request has been approved by the reviewer. The request cannot be updated.
- Denied—indicates the request has been denied. The request cannot be updated.
-
UR Supported Under TOMS Test Settings—indicates this resource is already available from the [Test Settings] tab of the student’s profile.
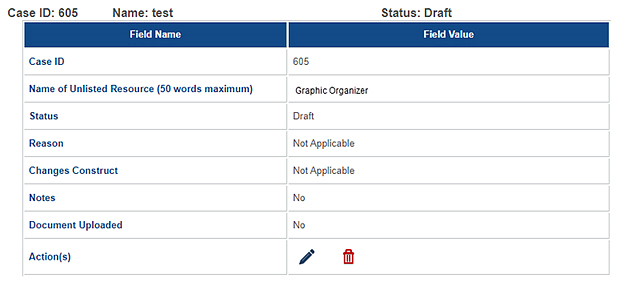
Figure 42. Other Unlisted Resources—Draft Status
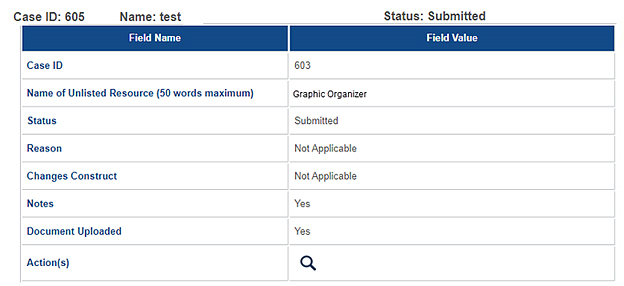
Figure 43. Other Unlisted Resources—Submitted Status
-
If the request requires more information before it can be approved the “Status” displays as “Additional Information Required” (figure 44). To provide the requested information select the pencil [
 ] icon, enter the information and then select the [Save] button for the request.
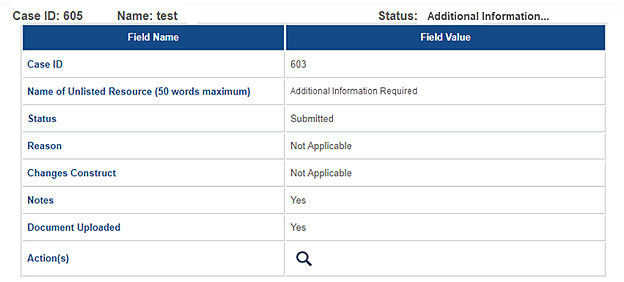
Figure 44. Other Unlisted Resources—Additional Information Required Status
-
When the request for “Other Unlisted Resources” is completely approved the “Other Unlisted Resource” section of the [Unlisted Resources] tab is displayed with a status of “Approved” (figure 45).
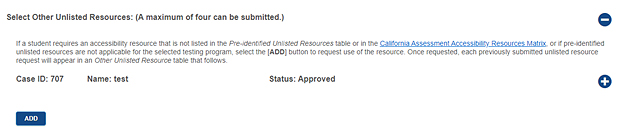
Figure 45. Other Unlisted Resources—Approved Status
Student Profile—Testing Status
Use the [Testing Status] tab to view the status of each test assigned to the student. The user will view the status first in the Testing Status By Test Type and Domain table and the Testing Status By Assessment table. The tab is available only to LEA-level coordinators.
Users will also be able to view a limited list of demographic changes received from CALPADS.
By allowing LEA coordinators to view test assignments both for CAASPP and the ELPAC, coordinators will be able to work together to ensure that students are being assigned the proper assessments. If an LEA coordinator received an error when attempting to change a student to an alternate assessment, the [Testing Status] tab will show if a student has started a summative assessment. Coordinators would then need to work together to determine whether a STAIRS case should be submitted to reset the taken assessments or continue the student with the currently assigned assessments.
Testing Status By Test Type and Domain
The Testing Status By Test Type and Domain table (figure 46) provides both the LEA CAASPP coordinator and LEA ELPAC coordinator the ability to view all tests assigned to a student as well as the current status for each domain.
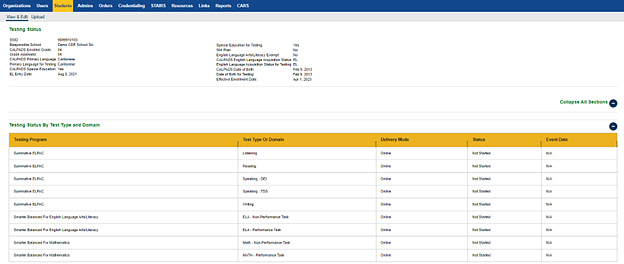
Figure 46. Testing Status By Test Type and Domain Table
Table 2 describes the fields in the Testing Status By Test Type and Domain table.
| Name | Description |
|---|---|
| Testing Program | This displays the tests assigned to the student. |
| Test Type or Domain | A separate row for each test type or domain for a test will be displayed. This will include DEI entries. |
| Delivery Mode | This is the mode in which the test is presented to the student. |
| Status |
This is the status of the listed test type or domain.
|
| Event Date | This is the date of the status listed. |
Testing Status By Assessment
The Testing Status By Assessment table (figure 47) provides both the LEA CAASPP coordinator and LEA ELPAC coordinator the ability to view all tests assigned to a student.

Figure 47. Testing Status by Assessment Table
Table 3 describes the fields in the Testing Status By Assessment table.
| Name | Description |
|---|---|
| Testing Program | This displays the tests assigned to the student. |
| Status |
This is the status of the listed test type or domain.
|
| Testing Status Date | This is the date that the test status was last updated. |
Demographic Changes
The Demographic Changes table provides both the LEA CAASPP coordinator and LEA ELPAC coordinator the ability to view demographic changes sent from CALPADS or fields changed on the basis of CALPADS data for the following fields:
- CALPADS Enrolled Grade
- Grade Assessed
- CALPADS Primary Language
- Primary Language for Testing
- CALPADS Special Education
- Special Education for Testing
- CALPADS ELAS
- ELAS for Testing
- 504 Plan
A drop-down list allows the user to filter to a specific field in the table (figure 48). The demographic fields will be updated each time TOMS receives information for the student. The demographic field may not have an actual change. However, any update from CALPADS for the student will be displayed as a new start date for each field.
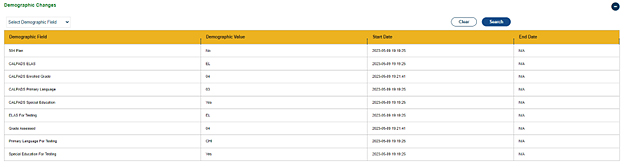
Figure 48. Demographic Changes Table
Table 4 describes the fields in the Demographic Changes table.
| Name | Description |
|---|---|
| Demographic Field | This is the name of the demographic field for which information is being displayed. |
| Demographic Value | This displays the current information as stored in TOMS. A blank would indicate no data received. |
| Start Date | The start date indicates the date of the last change in this field. |
| End Date | The end date is displayed when this value was changed. “N/A” indicates that the value of that row is the current demographic. |
Student Profile—Score Status Overview
Use the [Score Status] tab to view the score status of each test that is assigned to the student and the list of Appeals entered for this student. The [Score Status] tab also displays some of the student's demographic information—as recorded in CALPADS.
The student's score status is displayed in the corresponding score status table. One table is displayed for each test that is assigned to the student.
The following links provide more information about student score status:
- Student Score Status for CAASPP—View the student’s score status for each CAASPP test assignment and any recent Appeals.
- Student Score Status for ELPAC—For each ELPAC test assignment, view the student’s score status, score settings, and any recent Appeals.
Student Score Status for CAASPP
The [Score Status] tab displays the student's score status in the corresponding score status table (figure 49). One table is displayed for each test that is assigned to the student.
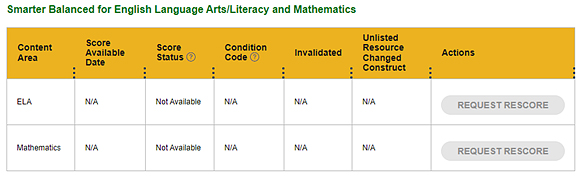
Figure 49. Score Status for the CAASPP
The Condition Code field will show one of the following codes for each assessment.
- INC0—Incomplete test (logged on, but no items were answered); assigned the LOSS (CAAs for ELA and mathematics only)
- INC1—Incomplete test (fewer than four items were answered); assigned the LOSS+1 (CAAs for ELA and mathematics only)
- LOSS—Lowest Obtainable Scale Score (Smarter Balanced for ELA and mathematics, CAST, and CSA only)
- N/A—No code has been entered for the assessment
- NEL—EL student enrolled in a US school less than 12 months (Smarter Balanced for ELA and CAAs for ELA only); this condition code updates after the close of the state testing window
- NER—Did not log on to each performance task (CAA for Science only)
- NT—Not tested
- NTE—Not tested due to significant medical emergency
- PGE—Not tested due to Parent/Guardian exemption
The [Score Status] tab also displays a list of Appeals (figure 50) that have been submitted through STAIRS for the student. If no Appeals have been submitted for this student, the following message is displayed: “The student has no Appeals available or applicable.”

Figure 50. Most Recent Appeals
Student Score Status for ELPAC
The [Score Status] tab displays the student's score status in the corresponding Score Status table (figure 51). One table is displayed for each test that is assigned to the student.

Figure 51. Score Status for the Initial Alternate ELPAC
The Condition Code field shows one of the following codes for each assessment:
- NT—Student was not tested.
- EXD—Student was marked exempt from any one domain. This is not applicable to the Initial Alternate ELPAC and Summative Alternate ELPAC.
The [Score Status] tab displays the student’s score settings in the corresponding Score Settings table (figure 52). One table is displayed for each test that is assigned to the student.
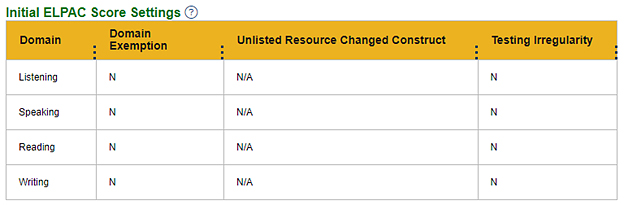
Figure 52. Initial ELPAC Score Settings
The [Score Status] tab also displays a list of Appeals (figure 53) that have been submitted through STAIRS for the student. If no Appeals have been submitted for this student, the following message is displayed: “The student has no Appeals available or applicable.”

Figure 53. Most Recent Appeals for ELPAC
Student Profile—Reporting Overview
Use the [Reporting] tab to view a specific student's score reporting options as well as to update the SSR language settings. The list of tests that are assigned for that student can be edited on the [Test Assignments] tab.
For student profile reporting:
- Changes made to the reporting options for the corresponding LEA or school on the Organizations [Reporting] tab will override the existing settings for a student; the most recent changes will always override older ones. If a student's reporting settings have been overridden by a more recent change for the student’s school or LEA, the student's reporting settings can be reset on the student’s [Reporting] tab.
- LEAs must notify CalTAC to change the video selection.
The following links provide more information about student reporting settings.
- Student Reporting Options for the CAASPP—View a student’s reporting options.
- Student Reporting Options for the ELPAC—View a student’s reporting options.
Student Reporting Options for the CAASPP
To update the reporting options, make the selections, and then select the [Update] button to save the changes to the SSR language settings.
LEAs must email their Success Agent to order video SSRs.
The following student’s reporting options can be updated:
- Reporting Option: SSR Language—Select a language from the list of supported languages. The language selected should match the student's primary language as saved in CALPADS. The choices are as follows:
- Arabic
- Chinese (Traditional)
- English
- Filipino
- Korean
- Spanish
- Vietnamese
Figure 54 shows the fields displayed on the [Reporting] screen.
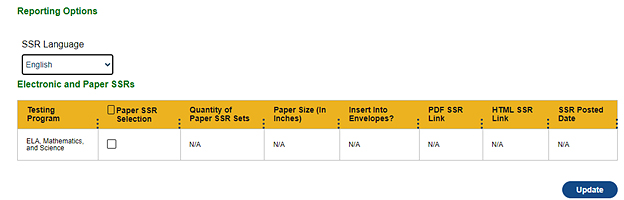
Figure 54. Reporting Screen for CAASPP
Student Reporting Options for the ELPAC
To update the reporting options, make the selections, and then select the [Update] button to save the changes to the SSR language settings.
The following student’s reporting options can be updated:
- Reporting Option: SSR Language—Select the language from the list of supported languages. The language selected should match the student's primary language as saved in CALPADS. The choices are as follows:
- Arabic
- Chinese (Traditional)
- English
- Filipino
- Korean
- Spanish
- Vietnamese
Figure 55 shows the fields displayed on the Reporting Options screen.
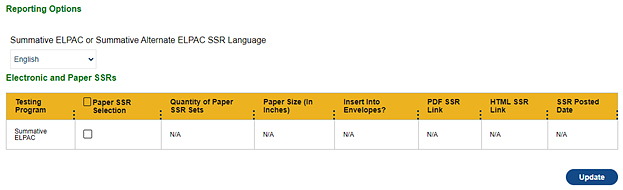
Figure 55. Reporting for the ELPAC