Add Users via Bulk Upload: Overview
LEA coordinators and site coordinators can use the Upload Users screen to add TOMS users in bulk. LEA and site coordinators can either edit the file of assigned users from the previous year’s test administration; or download a template from TOMS and then manually enter all users’ information on the Excel spreadsheet.
- Prepare a User File—Prepare a file of users to upload to TOMS by either editing the previous year’s file or downloading the Excel template.
- Validate the User File—Initiate the validation of the prepared file before uploading it to TOMS.
- User File Validation Results—Review the file validation results.
- Uploaded User File Status—Review the status of the file upload.
Quick Instructions
- Prepare a file of users to upload to TOMS by either editing the previous year’s file or downloading a template.
- Option 1: Edit the file of assigned users from the previous year’s test administration as follows:
- Select the [LEA Reports -> User List] link in the “Modify File from Previous Administration” section on the Prepare a File progress step.
- On the LEA Reports screen, select either CAASPP LEA User List Report or ELPAC LEA User List Report.
- Option 2: Select the [Download Template] button to download the Excel template from TOMS.
- Option 1: Edit the file of assigned users from the previous year’s test administration as follows:
- Take the following steps to prepare the file:
- Save the downloaded file to a local device.
- Complete the file in Excel.
- Save the completed file in .xlsx file format to the local device. Make a note of the file’s location on the local device.
After the template has been completed, select the [Next] button to move to the Validate File progress step.
In the Select File to Validate field, select the [Browse] button (Edge or Firefox) or the [Choose File] button (Chrome) to navigate to the location—on the local device—of the completed file, and then highlight the file.
- To validate the file and view the results displayed under the File Validation Results progress step of the Upload Users screen, select the [Next] button.
- Otherwise, to return to the Prepare a File progress step to check or correct the file before validation, select the [Previous] button.
Detailed Instructions
Follow these steps to create several new TOMS users at once using bulk upload. (For more details about any step, select its link.)
- Prepare a User File—Prepare a file of users to upload to TOMS by either editing the previous year’s file or downloading the Excel template.
- Validate the User File—Initiate the validation of the prepared file before uploading it to TOMS.
- User File Validation Results—Review the file validation results.
- Uploaded User File Status—Review the status of the file upload.
When adding users, coordinators should keep the following in mind:
- Each TOMS user can be assigned multiple roles using the same email address, even across sites. For each user, add one line per role to the template. For example, if User A is assigned two roles at Site One and one role at Site Two, add three lines to designate all three roles for User A (one for each role).
- LEA coordinators can submit user information only for schools within their LEA. Site coordinators can submit user information only for the school site with which they are associated.
To open the Upload Users screen (figure 1), select the [Users] navigation tab from the top navigation bar, and then select the [Upload] action tab.

Figure 1. Upload Users navigation
I. Prepare a User File
Use the Prepare a File progress step to either edit the file of assigned users from the previous year’s test administration or to download a template from TOMS, and then manually enter all users’ information.
- Do one of the following:
- Option 1: Edit the file of assigned users from the previous year’s test administration:
- Select the [LEA Reports -> User List] link in the “Modify File from Previous Administration” section on the Prepare a File progress step.
- On the LEA Reports screen, select either CAASPP LEA User List Report or ELPAC LEA User List Report.
- Make sure to change the test administration year to “Previous School Year” to retrieve the previous test administration’s users.
- Option 2: Select the [Download Template] button (figure 2) to download the template from TOMS.
- Option 1: Edit the file of assigned users from the previous year’s test administration:
-
Take the following actions to prepare the file:
- Save the downloaded file to a local device.
- Complete the file in Excel.
- Save the completed file in .xlsx file format to the local device. Make a note of the file’s location on the local device.
After the template has been completed, select the [Next] button to move to the Validate File progress step.
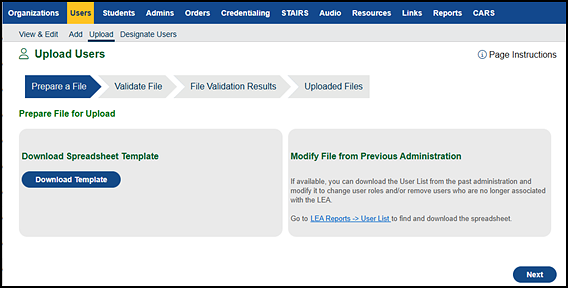
Figure 2. Prepare a File progress step
II. Validate the User File
Use the Validate File progress step to validate or check the format of the completed .xlsx file to be uploaded to TOMS (figure 3). Validation file results will be displayed when file validation finishes.
- Upon returning to TOMS, in the Select File to Validate field, select the [Browse] (Edge or Firefox) or [Choose File] (Chrome) button to navigate to the location—on the local device—of the completed file, and then highlight the file.
- To validate the file and view the results displayed under the File Validation Results progress step of the Upload Users screen, select the [Next] button.
- Otherwise, to return to the Prepare a File progress step to check or correct the file before validation, select the [Previous] button.
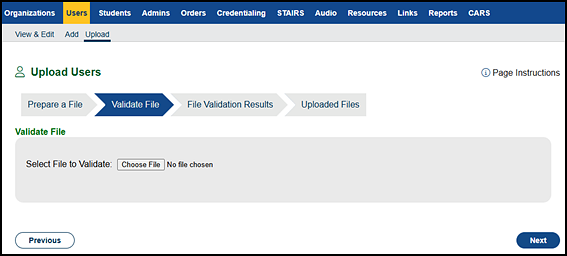
Figure 3. Validate File progress step
III. User File Validation Results
Use the File Validation Results progress step to view the validation results of the file upload(s) (figure 4). When a file is successfully validated, the [Upload] button is displayed. Select it to upload the file to TOMS. A red “Errors” message indicates that the file contains errors. The number of errors is displayed alongside, in parentheses. To download the list of errors, select the [Download Errors] down arrow [ ] icon. Depending on the size of the file, validation may take up to one hour.
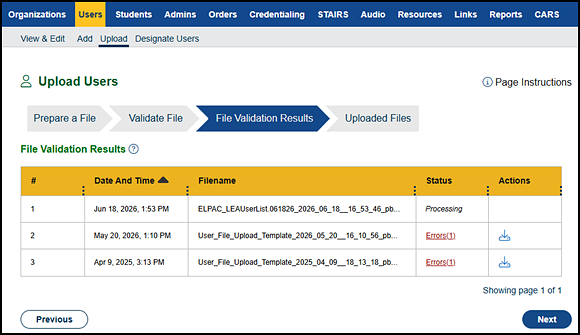
Figure 4. File Validation Results progress step
Table 1 describes each field on the File Validation Results progress step.
| Name | Description |
|---|---|
|
# |
This is the row sequence number for each row in the list. |
|
Date and Time |
This is the date and time the file was validated. |
|
Filename |
This is the name of the .xlsx file validated. |
|
Status |
This is the status of the file validation. The status can be any of the following:
|
|
Actions |
The [Download Errors] down arrow [ The [Upload] button is displayed for a file that was successfully validated. Select it to upload the file to TOMS. |
IV. Uploaded User File Status
The Uploaded Files progress step shows LEA and site coordinators the status of their uploaded files (figure 5). Table 2 describes each field on the Uploaded Files progress step.
Successfully uploaded files will display a status of “Uploaded.” If a file is not listed in the Status column of uploaded files, it may have failed to upload, or it may not have been uploaded before the next business day. These files can be found on the File Validation Results screen (figure 4). The user will need to upload these files again.
- To return to the Prepare a File progress step of the Upload Users screen, select the [Done] button.
- Otherwise, select the [Previous] button to go back to the File Validation Results progress step.

Figure 5. Uploaded Files progress step
| Name | Description |
|---|---|
|
# |
The row number for each row in the list |
|
Date and Time |
The date and time the file was uploaded |
|
Filename |
The name of the .xlsx file uploaded |
|
Status |
The status of the uploaded files, including the following:
|
|
Actions |
The [Download Errors] down arrow [ |