Upload Student Updates
LEA and site coordinators can use the Upload screen to prepare, validate, and upload a template to TOMS to update multiple students. LEAs can submit more than one file, and settings can be both activated and deactivated through file uploads.
To open the Upload Students screen (figure 1), select the [Students] navigation tab from the top navigation bar, and then select the [Upload] action tab.

Figure 1. [Students] navigation tab, [Upload] action tab
- Select an Upload Type—Select the student upload template type.
- Prepare a Student File—Use the current test administration year’s Excel template to prepare a file with student information to upload to TOMS.
- Validate the Student File—Initiate the validation of the prepared file before uploading it to TOMS.
- Student File Validation Results—Review the file validation results, and correct errors as needed.
- Uploaded Student File Status—Review the status of the file upload.
Please read the following important information regarding uploads:
- EL students assigned the CAAs will automatically be assigned the Alternate ELPAC.
- Do not use a template from a previous year. Templates vary from year to year, and using a template from a previous year will generate an error in TOMS.
- A validated file must be uploaded by 5 p.m. on the day the file is validated. If the file is not uploaded by that specified time, it will expire and will not be available for uploading.
- Previously assigned CAASPP test setting will be overwritten under the following circumstances:
- The student’s test assignment changed.
- The student’s data is included with a newly uploaded online student test settings file, and there is now a blank or new value in the field where a resource had been previously assigned in TOMS or from a previous upload.
- The student’s IDEA indicator in TOMS resets to “No” because of a change to the CALPADS education program code field (3.13). This code field must be set for “Special Education” (value 144) or “504 Plan” (value 101).
- The file has a recommended size of 5 MB (with a maximum of 10 MB), should contain 10,000 rows (with a maximum of 50,000), and cannot have blank rows between the rows of data.
Quick Instructions
- On the Upload screen, select the upload type from the drop-down list, and then select [Next].
- Prepare a file of students’ test assignments to upload to TOMS by downloading an Excel template.
- Select the [Download Template] button to download a template from TOMS.
- Take the following steps to prepare the file:
- Save the downloaded file to a local device.
- Complete the file in Excel.
- Save the completed file in .xlsx file format to the local device. Make a note of the file’s location on the local device.
- After the template has been completed, select the [Next] button to move to the Validate File progress step.
- Upon returning to TOMS, in the Select File to Validate field, select the [Browse] (Edge or Firefox) or [Choose File] (Chrome) button to navigate to the location—on the local device—of the completed file, and then select the file.
- To validate the file and view the results displayed under the File Validation Results progress step of the Upload Students screen, select the [Next] button.
- View the validation results of the file upload(s) (figure 7) in the File Validation Results progress step. When a file is successfully validated, the [Upload] button is displayed. Select it to upload the file to TOMS. A red “Errors” message indicates that the file contains errors. The number of errors is displayed in parentheses. To download the list of errors, select the [Download Errors] down arrow [
 ] icon. Depending on the size of the file, validation can take up to one hour.
Detailed Instructions
The following links provide information outlining each step for uploading test assignments or test settings for several students at once using bulk upload:
- Select an Upload Type—Select the student upload template type.
- Prepare a Student File—Use the current test administration year’s Excel template to prepare a file with student information to upload to TOMS.
- Validate the Student File—Initiate the validation of the prepared file before uploading it to TOMS.
- Student File Validation Results—Review the file validation results.
- Uploaded Student File Status—Review the status of the file upload.
To open the Upload Students screen (figure 2), select the [Students] navigation tab from the top navigation bar, and then select the [Upload] action tab.
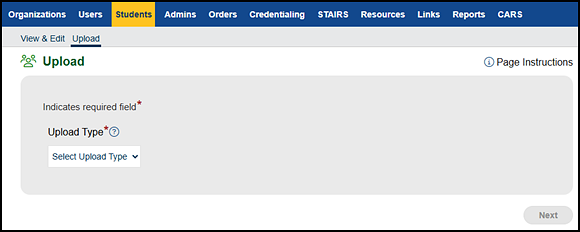
Figure 2. [Students] navigation tab, Upload screen
I. Select an Upload Type
On the Upload screen, select the “Upload Type” from the drop-down list (figure 3 and figure 4), and then select the [Next] button.
Upload types available for CAASPP:
- Test Assignments—Upload student test assignments:
- California Science Test for high school (CAST)
- California Alternate Assessments (CAAs)
- California Spanish Assessment (CSA)
- Condition Codes—Assign condition codes for multiple students to whom either the PGE or NTE condition code applies. Condition codes should be assigned as soon as the LEA becomes aware the condition exists and before the LEA’s test window end date. Condition codes cannot be assigned in a content area if the student has already submitted all portions of that assessment.
- Test Settings—Assign designated supports and accommodations.
- SSR Requests—Request an alternate language electronic SSR.
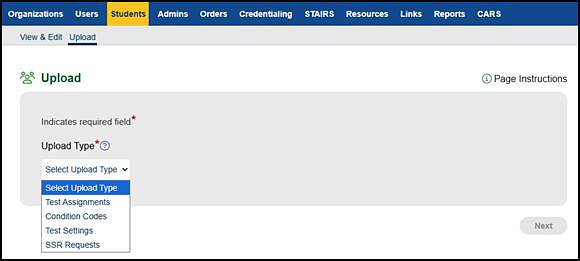
Figure 3. Upload screen with CAASPP types
Upload types available for ELPAC:
- Test Assignments—Upload student test assignments:
- Designate domain exemptions for the Initial ELPAC.
- Designate domain exemptions for the Summative ELPAC.
- Assign the Initial Alternate ELPAC and the Summative Alternate ELPAC.
- Test Settings—Assign designated supports and accommodations assignments for multiple students.
- SSR Requests—Request an alternate language electronic SSR.
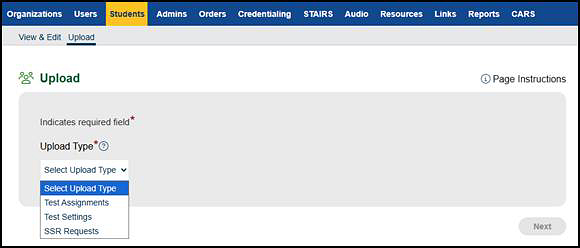
Figure 4. Upload screen with ELPAC types
II. Prepare a Student File
Use the Prepare a Student File progress step to download a template from TOMS, and then manually enter all student requests.
-
Select the [Download Template] button (figure 5) to download a template from TOMS.
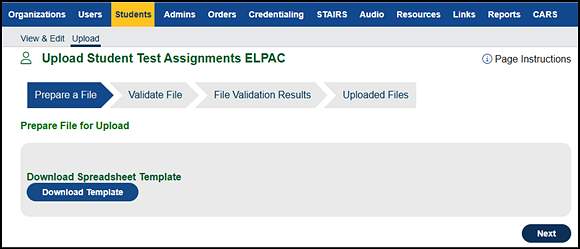
Figure 5. Prepare a File progress step
- Take the following steps to prepare the file:
- Save the downloaded file to a local device.
- Enter the required information by following the instructions on the first worksheet. Note the following parameters that apply to the file to be uploaded:
- The recommended file size is up to 5 MB, with a maximum allowable file size of 10 MB.
- The recommended number of rows is 10,000, with a maximum of 50,000.
- There cannot be any blank rows between the rows of data.
- Save the completed file in .xlsx file format to the local device. Make a note of the file’s location on the local device.
- After the template has been completed, select the [Next] button to move to the Validate File progress step.
III. Validate the Student File
Use the Validate File progress step to validate or check the format of the completed .xlsx file to be uploaded to TOMS (figure 6). The validation file status will be displayed when file validation begins.
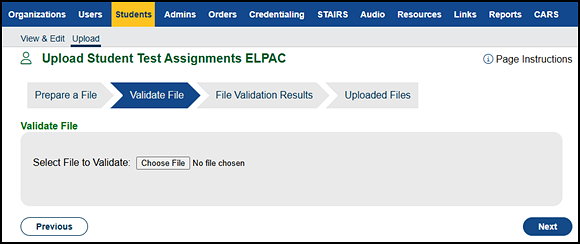
Figure 6. Validate File progress step
- In the Select File to Validate field, select the [Browse] (Edge or Firefox) or [Choose File] (Chrome) button to navigate to the location—on the local device—of the completed file, and then select the file.
- To validate the file and view the results displayed under the File Validation Results progress step of the Upload Students screen, select the [Next] button.
IV. Student File Validation Results
Use the File Validation Results progress step to view the validation results of the file upload(s) (figure 7). Table 1 describes each column on the progress step. When a file is successfully validated, the [Upload] button is displayed. Select it to upload the file to TOMS.
A red “Errors” message indicates that the file contains errors. Note the following about file validation errors:
- The number of errors is displayed in parentheses.
- To download the list of errors, select the [Download Errors] down arrow [] icon.
- Depending on the size of the file, validation can take up to one hour.
- Files are not validated from 9 p.m. to 6 a.m.
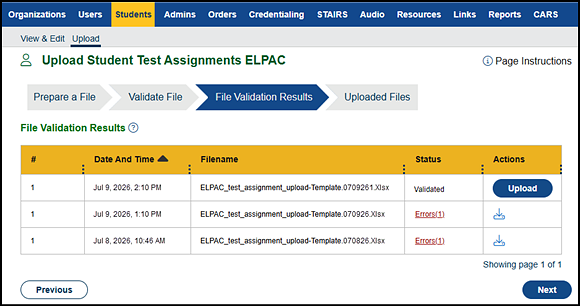
Figure 7. File Validation Results progress step
| Name | Description |
|---|---|
|
# |
This is the row sequence number for each row in the list. |
|
Date and Time |
This is the date and time when the file was validated. |
|
Filename |
This is the name of the .xlsx file validated. |
|
Status |
This is the status of the file validation, which can be any of the following:
|
|
Actions |
The [Download Errors] down arrow [ The [Upload] button is displayed for a file that was successfully validated. Select it to upload the file to TOMS. |
V. Uploaded Student File Status
The Uploaded Files progress step shows LEA and site coordinators the status of their uploaded files (figure 8). Table 2 describes each field on the progress step.
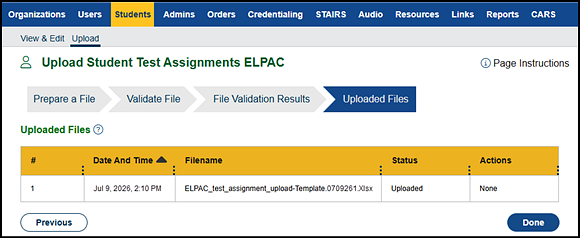
Figure 8. Uploaded Files progress step
Successfully uploaded files will display a status of “Uploaded.” If a file failed to upload or if it expired because it was not uploaded before the next business day, it will not be listed here. If the status is “Expired,” try uploading the file again.
- To return to the Prepare a File progress step of the Upload Students screen, select the [Done] button.
- To modify a previous step, select the [Previous] button to move back to the File Validation Results progress step.
| Name | Description |
|---|---|
|
# |
This is the row number for each row on the list. |
|
Date and Time |
This is the date and time when the file was uploaded. |
|
Filename |
This is the name of the .xlsx file uploaded. |
|
Status |
This is the status of the uploaded files, which can be any of the following:
|
|
Actions |
The [Download Errors] down arrow [ |