Place Primary Order
Use the Place Primary Order screens to place a primary order for standard, large-print, and braille test materials by entering the test material counts into a downloaded Material Counts template, validating the file, and then uploading it to TOMS.
Once a primary order has been submitted, the LEA cannot place another primary order. Instead, the LEA must wait to submit a supplemental order during the supplemental order window for materials needed in addition to those in the primary order. Information about the LEA’s supplemental order window can be found in the Calendar Summary on the View and Set Up Administrations screen, located under the [Test Administrations] action tab. For information about the primary and supplemental order dates, refer to the Initial ELPAC and Summative ELPAC web pages.
To locate the Place Primary Order screen, select the [Orders] tab in the navigation bar, and then select the [Place Primary Order] action tab (figure 1).

Figure 1. [Place Primary Order] action tab
Select one of the following links for help in placing a primary order:
- Quick Instructions—Select for quick instructions for placing a primary order.
- Detailed Instructions—Select for detailed instructions, including screen captures, for placing a primary order.
Quick Instructions
Use the following steps to place a primary order:
- Select the [Orders] tab on the navigation bar, and then select the [Place Primary Order] action tab.
- On the Place Primary Order screen, select the criteria for the primary order, and then select the [Continue] button.
- A confirmation pop-up message is displayed to confirm the shipping address. If the selected organization has both a primary and a secondary shipping address, select the address to be used for this order. Otherwise, confirm that the primary shipping address is correct.
- Select the [Download Template] button to download the Material Count template from TOMS to a local device. Follow the instructions included in the template to prepare the .xlsx file for upload. Direct any questions about using the template to your assigned LEA Success Agent.
- Select the [Next] button to advance to the Validate a File progress step.
- In the Select File to Validate field, select the [Browse] (Edge or Firefox) or [Choose File] (Chrome) button, and then select the file for upload.
- Select the [Next] button to advance to the File Validation Results progress step.
- To cancel the order, select the [Cancel] button.
- To return to the Validate a File progress step, select the [Previous] button.
- View the File Validation Results table. If the validation is successful—that is, there are no errors in the file—an email noting that the file is error free is sent to the user.
- Review each file’s validation status in the File Validation Results table.
- Error—Indicates that there are validation errors (In this case, a number displays in the Errors column, and the [Download] button is displayed in the Actions column. Select the number to view a pop-up list describing the errors encountered in the file. Select the [Download] button to download a .csv file that lists the errors in the .xlsx file that failed validation.)
- Processing—Indicates that the file is still processing
- Validated—Indicates that the file is successfully validated
- To continue with the order and move to the Uploaded Files progress step after a validated material counts .xlsx file is uploaded, select the [Next] button.
- To return to the Place Primary Order screen—Validate a File progress step, select the [Previous] button.
- If the completed material counts .xlsx file uploaded successfully, select the [Next] button to continue with the order.
- To cancel the order, select the [Cancel] button.
- To save the order to TOMS for completion at a later time, select the [Confirm] button.
- Use the Review Material Counts table to verify the material counts for each grade level in the primary order.
- If the order is correct, select the [Submit Order] button to save the order to TOMS. When the order has been successfully submitted, a confirmation pop-up message is displayed.
- To return to the Review and Submit progress step, select the [Cancel] button.
- To save the order to TOMS, select the [Confirm] button.
- When the order has been successfully saved in TOMS, a confirmation pop-up message is displayed.
- Select the [Close] button to close the message and to display the View and Track Orders screen.
- Otherwise, to cancel the order, select the [Cancel] button.
Detailed Instructions
To place a primary order, take the following steps in the sequence listed.
To locate the Place Primary Order screen, select the [Orders] tab in the navigation bar, and then select the [Place Primary Order] action tab (figure 2).
Figure 2. [Place Primary Order] action tab
Select Primary Order Criteria
- On the Place Primary Order screen (figure 3), select the criteria for the primary order:
- Organization
- Test Administration
- Testing Program
-
Once the information is entered, select the [Continue] button.
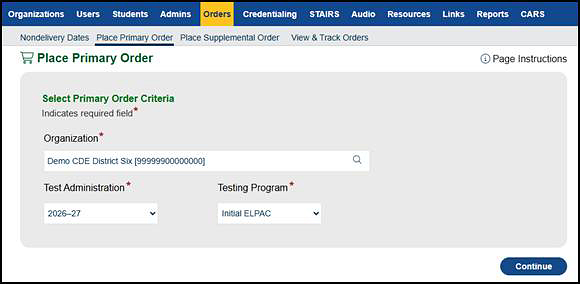
Figure 3. “Select Primary Order Criteria” section
- On the next screen, a confirmation pop-up message (figure 4) is displayed to confirm the shipping address. If the selected organization has both a primary and a secondary shipping address, select the address to be used for this order. Otherwise, confirm that the primary shipping address is correct.
- If the shipping address needs to be changed for the order, select the [Edit] button. The [Addresses] tab of the organization, where the shipping address can be changed, will be displayed.
- Otherwise, select the [Confirm] button to continue placing the order.
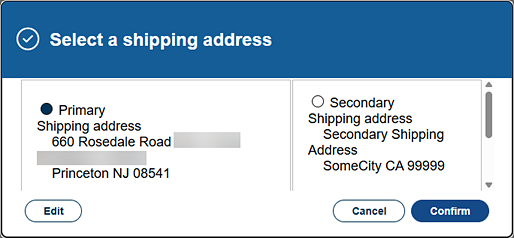
Figure 4. Select a shipping address confirmation message
Prepare File for Upload
- Select the [Download Template] button (figure 5) to download the Material Count template from TOMS to a local device. Follow the instructions included in the template to prepare the .xlsx file for upload. Direct any questions about using the template to the LEA Success Agent assigned to the LEA.
- Complete the file in Excel.
- Save the completed file in .xlsx file format.
-
After the template has been completed and the information has been saved on the local device, select the [Next] button to advance to the Validate File step.

Figure 5. Prepare a File progress step
Validate a File
-
In the Select File to Validate field (figure 6), select the [Browse] (Edge or Firefox) or [Choose File] (Chrome) button to navigate to the place on the local device where the completed file is saved, and then select the file.
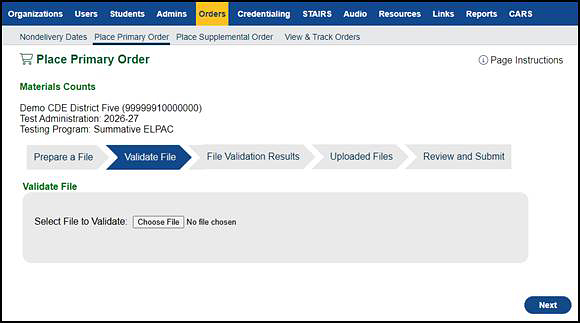
Figure 6. Validate a File progress step
- To continue to the File Validation Results progress step, select the [Next] button. Otherwise, take one of the following actions:
- To cancel the order, select the [Cancel] button.
- To return to the Place Primary Order screen—Validate a File progress step, select the [Previous] button.
Check for File Validation Errors
-
View the File Validation Results table (figure 7 and table 1). If the validation is successful—that is, there are no errors in the file—an email noting that the file is error free will be sent to the user.
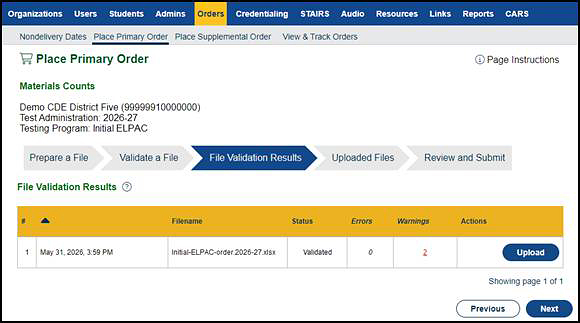
Figure 7. File Validation Results progress step
- Review each file’s validation status in the File Validation Results table.
- Error—Indicates that there are validation errors (In this case, a number displays in the Errors column, and the [Download] button is displayed in the Actions column. Select the number to view a pop-up list describing the errors encountered in the file. Select the [Download] button to download a .csv file that lists the errors in the .xlsx file that failed validation.)
- Processing—Indicates that the file is still processing
- Validated—Indicates that the file is successfully validated
- Select a button from the bottom of the screen.
- Select the [Next] button if the status is “Validated.”
- Select the [Previous] button to return to the previous screen.
| Field | Description |
|---|---|
|
# |
This is the row number for each file submitted for validation. |
|
Date |
This is the date and time the file was submitted for validation. |
|
Filename |
This is the name of the .xlsx file submitted for validation. |
|
Status |
This is the view-only file validation status, which is one of the following:
|
|
Errors |
Files with errors cannot be uploaded again. If the number of errors is greater than zero, the number becomes a hyperlink. Select the hyperlink to view the errors. |
|
Warnings |
The system displays an “excess materials warning” message if material counts exceed the standard counts by more than 10 percent. Users can upload a file with a warning. However, ordering excess materials can result in an additional charge to the LEA, so users are encouraged to review any warnings carefully. |
|
Actions |
After the file has successfully validated, the [Upload] button is displayed in the Actions column of the corresponding row. Select the [Upload] button to upload the order to TOMS. |
View the Uploaded Files
The Uploaded Files table (figure 8 and table 2) provides information about the uploaded files. An email will be sent, notifying the user whether the upload was successful.
If the completed material counts .xlsx file uploaded successfully, select the [Next] button to continue with the order. Otherwise, to return to the File Validation Results progress step, select the [Previous] button.
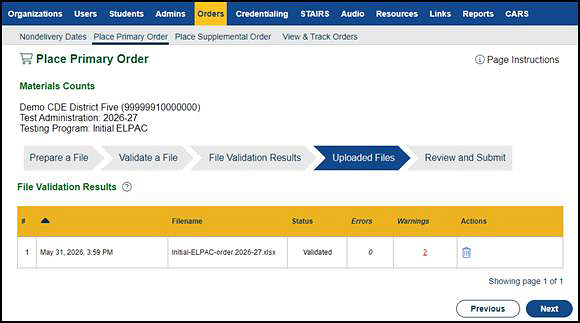
Figure 8. Uploaded Files progress step
| Field | Description |
|---|---|
|
# |
This is the row number for each file being uploaded. |
|
Date |
This is the date and time the upload process was initiated for each file. |
|
Filename |
This is the name of the .xlsx file uploaded. |
|
Status |
This is the file upload status, which is one of the following:
|
|
Errors |
Files with errors must be uploaded again. |
|
Warnings |
Users can upload a file with a warning. However, ordering excess materials can result in an additional charge to the LEA, so users are encouraged to review any warnings carefully. |
|
Actions |
|
 ] icon displays if there are any numbers shown in the Errors column.
Review and Submit
-
Review the Material Counts table (figure 9) to verify the material counts for each grade level in the primary order.
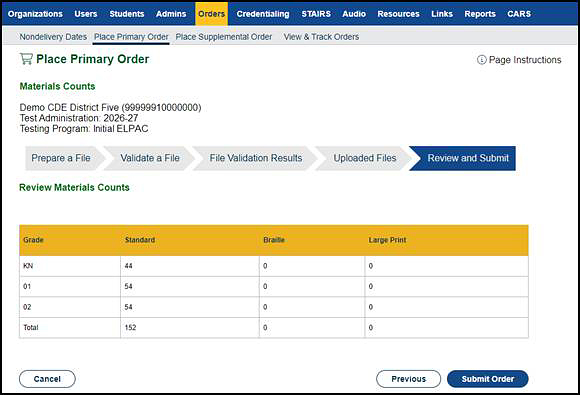
Figure 9. Review and Submit progress step
- If the order is correct, select the [Submit Order] button to save the order to TOMS. When the order has been successfully submitted, a confirmation pop-up message is displayed (figure 10). Otherwise, take one of the following steps:
- To return to the Place Primary Order screen—select the [Cancel] button.
- To return to the Place Primary Order screen—Uploaded Files progress step, select the [Previous] button.
- To save the order to TOMS, select the [Submit Order] button.
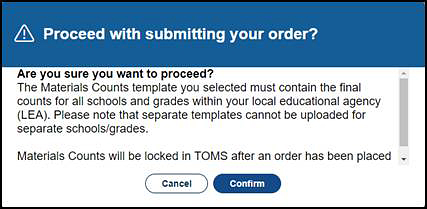
Figure 10. Proceed with submitting your order? confirmation message
- When the order has been successfully saved in TOMS, a confirmation message is displayed (figure 11).
- Select the [View & Track Orders] link to dismiss the pop-up message and go directly to the View and Track Orders screen.
- Select the [Close] button to close the message.
- Otherwise, to cancel the order, select the [Cancel] button.
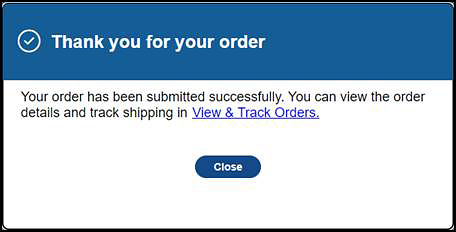
Figure 11. Thank you for your order message