View and Edit Existing Users: Overview
LEA coordinators have the primary responsibility for adding users to TOMS, including site coordinator roles, and may add other user roles to enable the designated users to administer, monitor, and manage CAASPP or ELPAC.
Once LEA coordinators add the users in TOMS, site coordinators can add test administrators, test examiners, and other school staff at their assigned site.
To access the View and Edit Users screen, select the [Users] navigation tab from the top navigation bar and then select the [View & Edit] action tab (figure 1).

Figure 1. [Users] navigation tab
Use the View and Edit Users screen for any of the following tasks:
- Quick Instructions—Access listed instructions for searching, viewing, and editing existing user fields.
- Search for an Existing User—Enter information into some or all of the search fields, and then select the [Search] button.
- View an Existing User—Select the user from the search results by selecting either the [Edit] pencil [
 ] icon or the [View] magnifying glass [
 ] icon. Users with the site coordinator role and higher can also activate or deactivate a user or reset a user’s password.
 - Edit an Existing User’s Role—Follow these steps to edit an existing user’s assigned roles and information:
Quick Instructions
- Select the [Users] navigation tab in the top navigation bar.
- Enter information into some or all of the search fields, and then select the [Search] button.
- Depending on their role, users will see either a pencil [] icon or a magnifying glass [] icon in the Action column of the search results.
- Selecting the magnifying glass [] icon allows users to view the contact information and assigned roles for a user.
- Selecting the pencil [] icon—available only to site coordinators and LEA coordinators—allows for the editing of the user’s information.
The remaining instructions are for site coordinators and LEA coordinators:
- Selecting the magnifying glass [
-
After selecting the pencil [
] icon, site coordinators and LEA coordinators can modify the information on each screen. For instructions on how to edit a user’s information, refer to Edit an Existing User. - Use the [Next] button on each screen to proceed through the user’s information. The [Previous] button will go back one screen.
-
Select [Save] on the Confirm and Save screen to save the modified information.
When on the Search Results screen, coordinators can also activate users, deactivate users, and reset passwords.
- To activate an inactive user or reset a password, select the [Activate] arrow circle [
 ] icon.
 - To deactivate a user, select the [Deactivate] link.
Search for an Existing User
To search for an existing user, select the [Users] navigation tab in the top navigation bar. This opens the View and Edit Users screen (figure 2). Use the standard search feature instructions to complete the necessary fields. After entering text in any of the search fields:
- Select the [Search] button. The View and Edit Users screen then displays the search results.
-
Otherwise, select the [Clear] button to clear all the information and start a new search if needed.
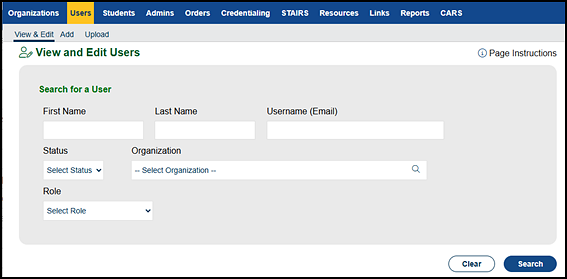
Figure 2. View and Edit Users screen
View an Existing User (LEA Coordinators and Site Coordinators Only)
To find an existing user, refer to Search for an Existing User. The search results on the View and Edit Users screen display a list of users matching the search term(s) (figure 3).
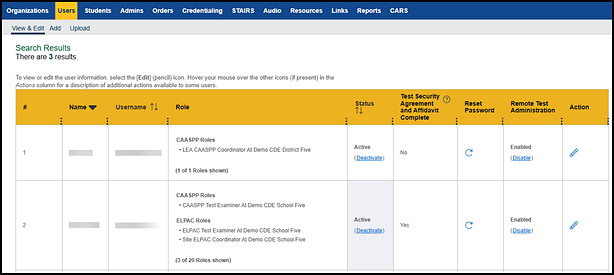
Figure 3. View and Edit Users—search results
Take one of the following actions to change LEA coordinators and site coordinators:
- To view and edit the selected user role, select the [Edit] pencil [] icon. The user is taken to the User Name and Contact Information screen. For instructions on how to edit a user’s information, refer to Edit the User’s Existing Role(s) (available to users in the site coordinator role and higher).
- To activate an inactive user, select the [Reset Password] arrow circle [] icon (available to users in the site coordinator role and higher). The user will receive an email to reset the password.
- To add a role, select the [Edit] pencil [] icon in the user’s row, select the [Next] button repeatedly until the Add Role screen is displayed, and then follow directions to add a role (available to users in the site coordinator role and higher).
- To toggle the user’s access, select the [Deactivate] link or [Reset Password] arrow circle [] icon (available to users in the site coordinator role and higher).
- To toggle the user’s remote test administration’s access, select the [Enable] link or select the [Disable] link (available to users in the LEA coordinator role only).
View an Existing User (Non-Coordinators)
-
Select the [View] magnifying glass [
] icon to view the details of the selected user and the user’s role(s) in a pop-up box (figure 4). When finished, select the [Close] button.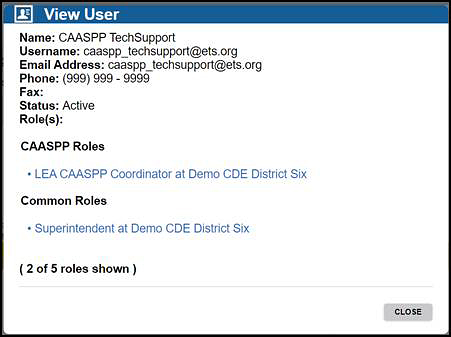
Figure 4. View user details and roles
Edit an Existing User's Role
To find an existing user, refer to Search for an Existing User. Then, follow these steps to edit the existing user’s assigned roles and information:
- Update the User’s Name and Contact Information.
- Edit the User’s Existing Role(s).
- Add a Role for a User.
- Confirm and Save Changes.
I. Update the User’s Name and Contact Information
Use the User Name and Contact Information screen to edit the previously saved user contact information. Select the [Next] button to edit the roles assigned to this user.
When the [Edit] pencil [] icon is selected from the search results, the User Name and Contact Information screen is displayed (figure 5). Use this screen to view or edit information about the selected user.
After confirming the information, select the [Next] button.
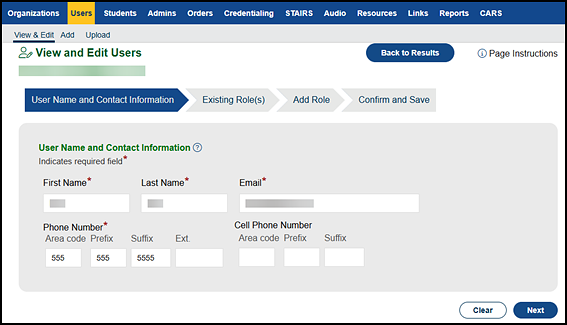
Figure 5. User Name and Contact Information progress step
II. Edit the User’s Existing Role(s)
Use the Existing Roles screen to verify the existing role(s) for the user. Roles previously assigned to the user can be removed here. To delete a single role, select the [Delete] trash can [ ] icon in the Actions column. To delete multiple roles, check the box next to the roles you wish to delete, and then select the [Delete Selected] button.
This screen displays any existing role(s) for the user (figure 6).
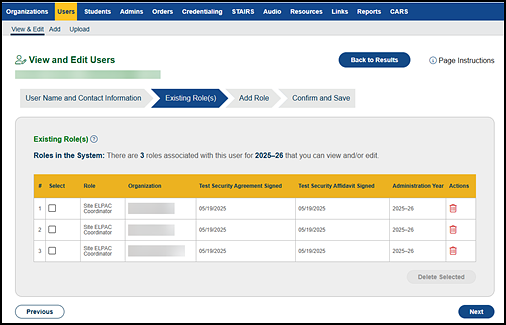
Figure 6. Existing Role(s) progress step
- To delete a role for a user, check the box next to the role, and then select the [Delete] trash can [] icon in the Actions column.
- When finished, select the [Next] button; the Add Role screen is then displayed (figure 7).
III. Add a Role for a User
Use the Add Role screen to add a new role for a user. Users may have multiple roles within TOMS.
Use this screen to add a TOMS user role to the user account (figure 7).
- Select an organization, role, and test administration year(s), and then select the [Next] button to add a role—or roles, one at a time—for the user. The user is assigned the role for each selected test administration year and will be required to sign the Test Security Agreement (coordinators only) and Test Security Affidavit (all users) upon logging on to TOMS for the first time after the role assignment is made.
-
Make sure all information is correct, and then select the [Next] button.
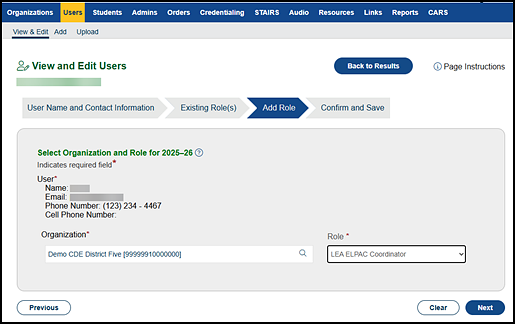
Figure 7. Add Role progress step
IV. Confirm and Save Changes
Use the Confirm and Save screen to confirm and save changes for the user. Review the information on this screen (figure 8).
- To save the newly added role and return to the User Name and Contact Information screen, where the information just entered is displayed, select the [Save] button.
-
Otherwise, if the wrong user is displayed at any point or the information is incorrect, select the [Previous] button to go back to the Add Role screen to correct the previously entered information.

Figure 8. Confirm and Save progress step