Literary Assistance Resources
Text-to-Speech
This subsection contains information about TTS requirements. TTS reads on-screen text aloud for students who may have reading impairments. The TDS includes embedded TTS that can be turned on for a student after the student test settings in TOMS have been assigned. For students to test with TTS, a supported voice pack will need to be installed on their device before testing begins. (Supported voice packs are described in the next subsection.) Students testing with TTS should also have a supported headset or headphones.
Students are recommended to use a desktop, laptop, or tablet running Windows, macOS, Linux, or iPadOS for testing; these platforms allow the student to pause the TTS. While the Chromebook does not pause reading, its highlight feature will read text indicated by the student.
Supported Voice Packs
Using TTS requires at least one voice pack to be installed on testing devices.
A number of voice packs are available for testing devices, and all voice packs are researched and tested for compatibility with the secure browsers. However, not all voice packs that come preinstalled with operating systems are approved for use with computer-based testing.
What follows is a list of the supported voice packs for students testing with TTS. A student who needs to use a supported voice pack not listed in this table should test it with a practice test to ensure there are no issues before its use with an operational assessment. Practice tests are available on the Practice and Training Test Site.
The student using TTS for the practice test must log on using a supported secure browser. Secure browsers are available for download on the CAASPP and ELPAC Secure Browsers website. The student can also verify that TTS works on the testing device by logging on to a practice test session using a supported secure browser or Chrome, Firefox, or Edge web browser, and then selecting an assessment for which TTS is available.
- Windows for English assessments: All built-in voice packs
- Windows for Spanish assessments: Spanish (Mexico)
- macOS built-in voice packs
- iPadOS built-in voice packs
- Chromebook built-in voice packs
- Heather Infovox iVox HQ (macOS only)
- Rosa Infovox iVox HQ (macOS only)
- Linux voice packs as listed in the Configuring Linux TTS Settings subsection
Overview of TTS
Using TTS
After configuration of TTS, the student or teacher may test the functionality on a practice test administered through a supported secure browser before using it for operational testing. Students or teachers can also verify that TTS works on testing devices by logging on to a practice test session and selecting an assessment for which TTS is available.
How the Secure Browser Selects Voice Packs
This subsection describes how the secure browsers select which voice pack to use.
Voice Pack Selection on Desktop Versions of Secure Browsers
When a student who is using TTS starts an assessment, the secure browser looks for voice packs on the student’s device. Upon recognizing an approved voice pack, the secure browser uses the one with the highest priority.
If any of the approved voice packs has been set as the default voice on the device, then that voice pack will always get the highest priority.
Voice Pack Selection on Mobile Versions of Secure Browsers
The mobile secure browser uses either the device’s native voice pack or a voice pack embedded in the secure browser. Additional voice packs downloaded to a mobile device are not recognized by the mobile secure browser.
Configuring Windows TTS Settings
This subsection explains how to configure Windows for using TTS with installed voice packs for the secure browser. The TTS resource is available on Windows versions as listed on the CAASPP and ELPAC Secure Browsers website. Windows devices are typically shipped with at least one default voice pack. Many of the default voice packs are recognized by the secure browser. The selections made here can also impact STT.
The instructions in this subsection to configure Windows TTS settings are for Windows 10 and 11. Images presented here are for Windows 11.
- Type settings in the Search field on the taskbar or the Windows Start menu and then press [Enter] (or select its link).
-
Open the speech resource in the Windows settings by selecting [Time & language] in the left panel and then selecting the [Speech] link on the right (figure 1).
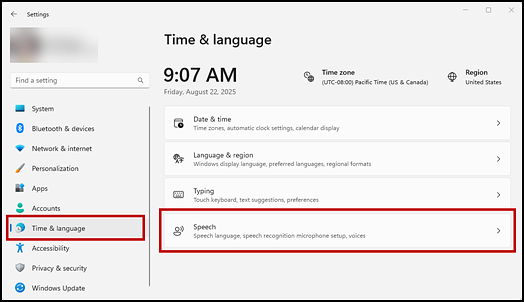
Figure 1. [Speech] link in the Windows Settings screen
- In the Speech interface, configure default TTS preferences (figure 2).
- Speech language: Choose a language for the system to use.
- Voices: If multiple voice packs are available, select the default voice.
- Select the [Preview voice] button to hear a sample of the voice and determine whether the selected voice requires a rate adjustment.
-
Voice speed: If necessary, adjust the voice speed. Drag the slider to make the voice speak slower or faster. To listen to the rate, select the [Preview voice] button.
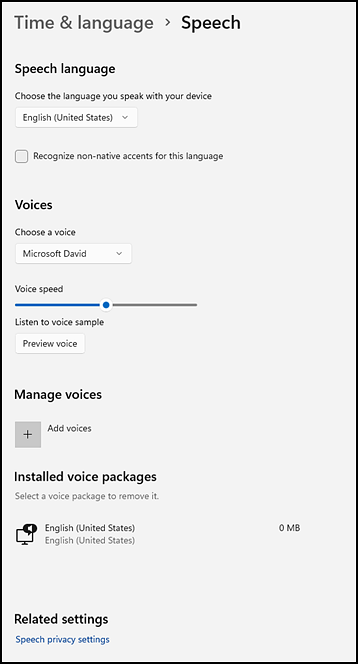
Figure 2. Default TTS preferences in Windows
- Select the [Speech privacy settings] link and toggle it to “Off” to ensure that Microsoft’s online speech recognition is not used.
Configuring macOS VoiceOver TTS Settings
This subsection explains how to configure macOS VoiceOver for using TTS with the secure browser. The TTS feature is available on macOS versions as listed in the System Requirements document. Using table 1 as a reference, install voice packs from the indicated packages—these are the supported voice packs.
| Vendor | Voice Pack | Language |
|---|---|---|
|
Mac (preinstalled) |
Agnes |
English |
|
Mac (preinstalled) |
Alex |
English |
|
Mac (preinstalled) |
Bruce |
English |
|
Mac (preinstalled) |
Callie |
English |
|
Mac (preinstalled) |
David |
English |
|
Mac (preinstalled) |
Fred |
English |
|
Mac (preinstalled) |
Jill |
English |
|
Mac (preinstalled) |
Junior |
English |
|
Mac (preinstalled) |
Kathy |
English |
|
Mac (preinstalled) |
Princess |
English |
|
Mac (preinstalled) |
Ralph |
English |
|
Mac (preinstalled) |
Samantha |
English |
|
Mac (preinstalled) |
Tom |
Spanish |
|
Mac (preinstalled) |
Vicki |
English |
|
Mac (preinstalled) |
Victoria |
English |
|
Mac (preinstalled) |
Diego |
Spanish |
|
Mac (preinstalled) |
Javier |
Spanish |
|
Mac (preinstalled) |
Marta |
Spanish |
|
Mac (preinstalled) |
Monica |
Spanish |
|
Mac (preinstalled) |
Paulina |
Spanish |
|
Infovox (commercial) |
Heather Infovox iVox HQ |
English |
|
Infovox (commercial) |
Rosa Infovox iVox HQ |
Spanish |
macOS devices are typically shipped with at least one default voice pack. Many of these default voice packs are recognized by the secure browser.
Prior to launching the secure browser, VoiceOver voice settings can be adjusted based on each student’s individual needs prior to launching the secure browser. The voice profile and speaking rate settings must be adjusted prior to administering assessments. A student should take a practice test using VoiceOver to determine whether these settings need to be adjusted.
Take the following steps to adjust VoiceOver voice settings.
Open the VoiceOver Utility
-
Choose the Apple menu ➔ System Settings (figure 3).
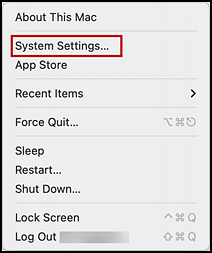
Figure 3. Apple menu
-
Select [Accessibility] from the left navigation panel (indicated in figure 4).

Figure 4. VoiceOver option in the macOS System Settings Accessibility panel
- Select [VoiceOver] in the “Vision” section on the right side of the screen (also indicated in figure 4).
-
Open the VoiceOver Utility by selecting the [Open VoiceOver Utility] button (figure 5).
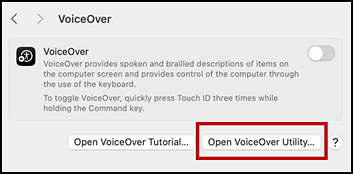
Figure 5. Open the VoiceOver Utility
Assign a Primary Voice
- Open the VoiceOver Utility.
-
In the left panel, select [Speech](shown in figure 6).
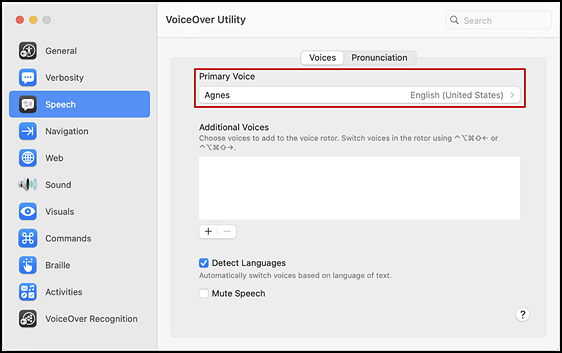
Figure 6. [Voices] tab in the Speech panel of the VoiceOver Utility screen
- On the [Voices] tab, select a voice profile from the Primary Voice drop-down list (indicated in figure 6).
-
To adjust the voice rate, select the voice and then adjust the Rate slider (figure 7) to the desired rate of speed; the lower the rate, the slower the words are read aloud.
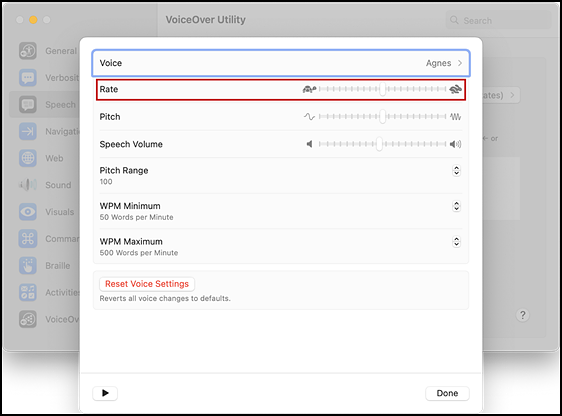
Figure 7. Rate slider in the Voice settings of the VoiceOver Utility screen
Set a Shortcut Through Accessibility Settings
Prior to testing with VoiceOver, set its shortcut. This setting allows the student to quickly enable VoiceOver from the Accessibility Shortcuts window by pressing [Command] (⌘) + [Option] + [F5] and then selecting VoiceOver.
-
Choose the Apple menu ➔ System Settings (figure 8) to open the System Settings screen.
Figure 8. Apple menu
-
Select [Accessibility] from the left navigation panel (shown in figure 9).
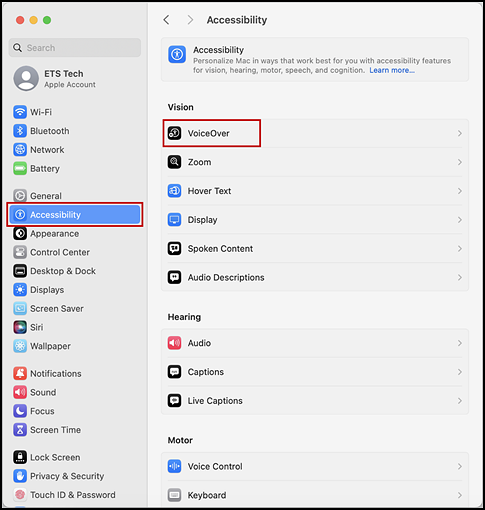
Figure 9. VoiceOver option in the macOS System Settings Accessibility panel
- Select [VoiceOver] in the “Vision” section on the right side of the screen (also indicated in figure 9).
-
Mark the VoiceOver checkbox (indicated in figure 10).
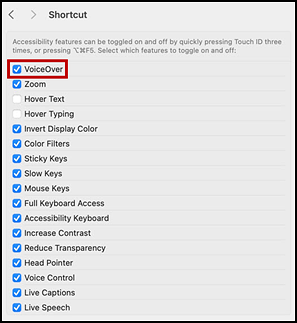
Figure 10. Shortcut option in the macOS System Settings Accessibility panel
Disabling the TTS Keyboard Shortcut
A macOS feature allows users to have any text on the screen read aloud by selecting the text and pressing a preset key or set of keys on the keyboard. By default, this feature is disabled and must remain disabled so as not to compromise test security. Take the following steps to disable this feature.
-
Choose the Apple menu ➔ System Settings (figure 11) to open the System Settings screen.
Figure 11. Apple menu
-
Select [Accessibility] from the left navigation panel (indicated in figure 12).
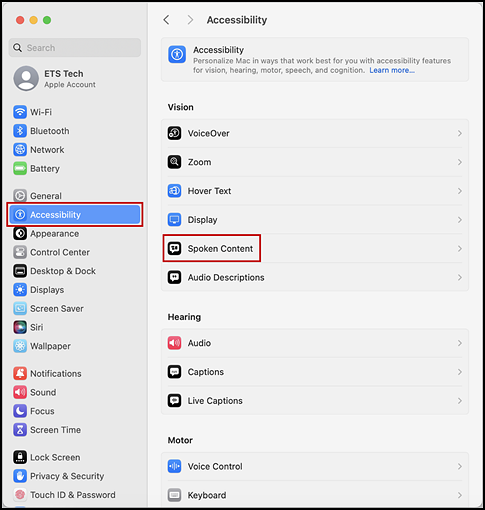
Figure 12. Spoken Content option in the macOS System Settings Accessibility panel
- Select [Spoken Content] in the “Vision” section on the right side of the screen (also indicated in figure 12).
-
When the Spoken Content panel opens on the right, confirm that Speak selection and the rest of the settings in that group are toggled left, to the “off” position (figure 13).
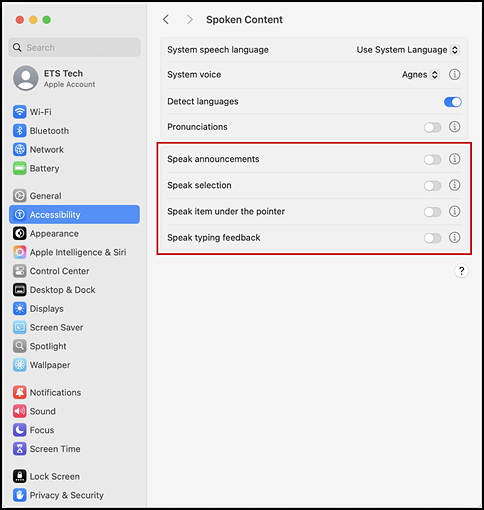
Figure 13. Spoken Content panel in the macOS System Settings screen
- If the settings in the following group are not already disabled, toggle them off by sliding the toggle to the left:
- Speak announcements
- Speak selection
- Speak item under the pointer
- Speak typing feedback
- Close the System Settings screen.
Configuring Linux TTS Settings
Available Standard Voice Packs
This subsection explains how to install voice packs on the supported Linux distributions. Using table 2 and table 3 as references, install voice packs from the indicated packages—these are the supported voice packs.
- Install Festival for TTS:
- Ubuntu: sudo apt-get install festival
- Fedora: yum install festival
- Install Sound eXchange (SoX) for TTS:
- Ubuntu: sudo apt-get install sox
- Fedora: yum install sox
Piper TTS for Fedora
Piper TTS is an open-source, TTS engine for Linux that is supported by the secure browser for Linux.
Take the following steps to install Piper TTS for Fedora using an .rpm package. These instructions may vary for an individual Fedora version.
- Navigate to the CAASPP and ELPAC Secure Browsers website by visiting Technology Resources and Secure Browsers and then selecting the [Secure Browsers] link.
-
Select the [Linux] tab and then select the [Download Piper TTS] button for Fedora (figure 14).

Figure 14. [Download Piper TTS] for Fedora button
- Locate the piper.rpm installation package in the Downloads folder.
- Right-click to open the context menu and then select Open in Terminal. The terminal window opens.
- Type sudo yum install -y./piper.rpm into the window and press [Enter].
- Enter the password for the sudo user and then press [Enter] again.
Piper voice packs can be downloaded from the “Available to Install” section of the Piper TTS Tool landing page.
Take the following steps to uninstall Piper TTS for Fedora:
- Open the Terminal.
- Enter sudo yum remove -y piper.rpm and press [Enter].
- Enter the password for the sudo user and then press [Enter] again.
Piper TTS for Ubuntu
Piper TTS is an open-source, TTS engine for Linux that is supported by the secure browser for Linux.
Take the following steps to install Piper TTS for Ubuntu using a .deb package. These instructions may vary for an individual Fedora version.
- Navigate to the CAASPP and ELPAC Secure Browsers website by visiting Technology Resources and Secure Browsers and then selecting the [Secure Browsers] link.
-
Select the [Linux] tab and then select the [Download Piper TTS] button for Ubuntu (figure 15).

Figure 15. [Download Piper TTS] for Ubuntu button
- Locate the piper.deb installation package in the Downloads folder.
- Right-click to open the context menu and then select Open in Terminal. The terminal window opens.
- Type sudo apt install -y./piper.deb into the window and press [Enter].
- Enter the password for the sudo user and then press [Enter] again.
Piper voice packs can be downloaded from the “Available to Install” section of the Piper TTS Tool landing page.
Take the following steps to uninstall Piper TTS for Ubuntu:
- Open the Terminal.
- Enter sudo apt remove -y piper.deb and press [Enter].
- Enter the password for the sudo user and then press [Enter] again.
Speech-to-Text
STT technology transcribes a student’s spoken words into text for responses to test questions in the TDS. Students with the appropriate accommodations may use STT assistive technology while taking assessments. It is recommended that students who have been assigned this resource use the embedded STT resources in the TDS, which can be used without an external application. This embedded resource can be tracked by the CAASPP or ELPAC programs when gathering data about students’ resource use.
If a student needs to use a third-party STT software, refer to the list in table 4 for the software that has been tested with the TDS. The TDS currently supports several non-embedded STT applications.
A student using STT technology will need to use a headset with a microphone while testing. Any wired headset with a 3.5 mm or USB connection should be compatible.
After configuration of a STT application, the student may test that application on a practice test administered through a supported secure browser prior to using it for operational testing.
Table 4 lists STT applications that have been tested with the TDS.
| STT Technology | Supported Versions | OS Requirements | Additional Details |
|---|---|---|---|
|
Dragon NaturallySpeaking Home & Individual Professional—Windows |
|
|
|
|
|
|
|
|
|
|
|
|
|
|
|
|
|
|
Configuration Guidelines for STT Applications
Some applications listed in table 4 require additional configuration to prepare for use during computer-based testing. Necessary configurations are described in this subsection. Some applications send data to the cloud for processing by default. Where noted, this feature should be disabled by the TA or TE to ensure the security of test data.
After an application is configured, CAI strongly recommends testing that application on a practice test administered through the secure browser prior to using it for operational testing.
Dragon NaturallySpeaking Home or Professional Individual for Windows
Take the following steps to configure Dragon NaturallySpeaking for student testing:
-
Open the Options dialog box presented in figure 16 by accessing the Tools drop-down list on the DragonBar and then selecting the Options item.
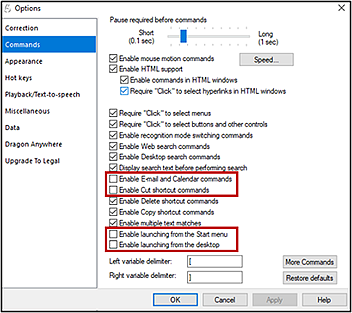
Figure 16. Dragon [Commands] tab in the Options dialog box
- On the [Commands] tab, displayed, uncheck the following boxes, as indicated in figure 16:
- Enable E-Mail and Calendar commands
- Enable Cut shortcut commands
- Enable launching from the Start menu
- Enable launching from the desktop
-
On the [Miscellaneous] tab (figure 17), uncheck the Use the Dictation Box for unsupported applications box.
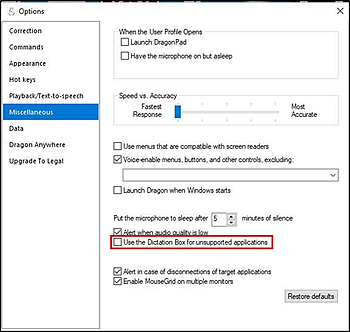
Figure 17. Dragon [Miscellaneous] tab in the Options dialog box
-
Open the Administrative Settings dialog box presented in figure 18 by accessing the Tools drop-down list on the DragonBar and then selecting the Administrative Settings item.
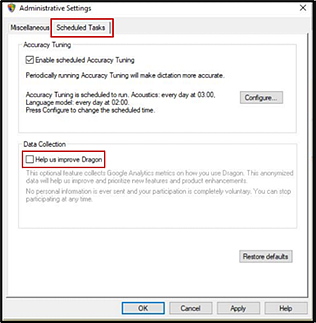
Figure 18. Dragon [Scheduled Tasks] tab in the Administrative Settings dialog box
- On the [Scheduled Tasks] tab (indicated in figure 18), uncheck the Help us improve Dragon box (also indicated in figure 18).
- Dragon 16 users should uncheck the Help us Improve Dragon box.
- Dragon 15 users should uncheck the Enable scheduled Data Collection box.
Setting Up User Profiles for Students
Dragon NaturallySpeaking requires each student to use a specific user profile. Create user profiles and ensure that Dragon NaturallySpeaking is set to the proper profile for each student prior to testing. When creating a profile, the student’s age range, language, and accent can be selected, and the audio input devices can be set. The student will then read aloud prompts that Dragon NaturallySpeaking uses to learn the student’s voice.
After creating one or more profiles, the [Profiles] button can be selected in the Dragon toolbar. Selecting [Open User Profile…] switches between user profiles (refer to figure 19). Refer to the Dragon NaturallySpeaking—Windows website for more information about creating a user profile.
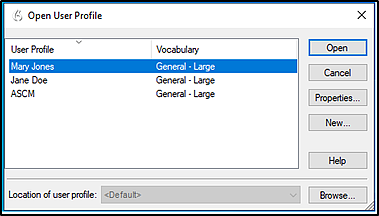
Figure 19. Dragon NaturallySpeaking—Open User Profile
Read&Write for Windows
Read&Write has an Exam Mode that can be used to turn off features for a single student on the particular testing device. When Exam Mode is enabled, the student will have access to only the selected features on the toolbar and certain speech settings, including voice selection, speed, pitch, and Speak As I Type; the full settings menu will not be accessible.
Take these steps to use Exam Mode; refer also to Using Exam Mode in Read&Write for Windows.
- Open Read&Write.
- Select the [Settings] button.
- Select the [Show more settings] link.
- Type adminsettings in the Find a Setting field.
- Enter and confirm a password to grant administrator access on this computer; select the [OK] button.(This username and password are associated with the administrative account for the user’s Read&Write subscription.)
- Select the [Select your features] tab and then select which feature(s) to enable on the student’s toolbar.
- Select the Use Exam Mode now toggle to start Exam Mode.
- Close the Read&Write menu to start the assessment.
Windows Speech Recognition
Prior to testing day, the Windows built-in Speech Recognition application must be set up on each testing device that will be used by students who require STT. The application can be set up by selecting Speech Recognition in the Windows Control Panel. During setup, Speech Recognition Voice Training must be completed by the student for optimal performance.
On the day of testing, the student using non-embedded STT should launch the secure browser (with permissive mode enabled), enter the assessment, and then launch the Windows Speech Recognition software. This will allow the secure browser to recognize the software and permit students to proceed through the assessment.
While Windows Speech Recognition is processing speech, the testing site may slow down. If transcription is not needed for testing, make sure Windows Speech Recognition is not listening to prevent this slowness from interfering with test performance.
Windows Voice Access
Prior to testing day, the Windows built-in Voice Access application must be set up on each testing device that will be used by students who require STT. The application can be set up by opening Settings, selecting [Accessibility], and then selecting [Speech]. Set the Voice Access toggle to the right (“On”).
WordQ+SpeakQ (WordQ5)
To minimize security risks, WordQ+SpeakQ—also known as WordQ5—includes an Exam Mode feature, which can be enabled through the application’s settings. Note the following about Exam Mode:
- It must be set for a minimum of 1 hour and a maximum of 12 hours.
- Exam Mode may not eliminate all security risks.
- Once Exam Mode has been set, it cannot be disabled until the configured time has run out.
Take the following steps to turn on Exam Mode and set the timer:
- Open WordQ+SpeakQ.
- Select the [Options] icon.
- Select [Exam Mode]; the EXAM MODE pop-up window appears.
- Set the exam time limit in the Exam Mode time limit field at the bottom of the window.
- Check or uncheck the Word usage examples and Single words added by the user, including topic words boxes to enable or restrict these features.
Word Completion
Word completion applications, which use predictive text technology, will allow a student to begin writing a word when responding to a test item and let the student choose from a list of single words that have been predicted from word frequency and syntax rules. The TDS uses the Co:Writer word completion tool, which is supported on all devices for most content areas; exceptions are as follows:
- The on-screen equation editors in mathematics assessments do not work with word completion on Windows and MacOS devices.
- Students should use an external keyboard for word completion to function correctly in iPadOS.
Table 5 lists third-party word completion applications that have been tested with the TDS.
| Predictive Text Technology | Supported Versions | OS Requirements | Additional Details |
|---|---|---|---|
|
|
|
|
|
|
|
Configuration Guidelines for Word Completion Applications
Read&Write for Windows
Read&Write has an Exam Mode that can be used to turn off features for a single student on the particular testing device, although not for macOS. When Exam Mode is enabled, the student will have access to only the selected features on the toolbar. For students requiring word completion, Word Prediction should be enabled. Read&Write for Windows also includes TTS and STT (talk and type) features, which should be enabled for students with the proper accommodation settings only.
Take these steps to use Exam Mode; refer also to Using Exam Mode in Read&Write for Windows.
- Open Read&Write as the student who is testing.
- Select the [Settings] button in the upper-right corner of the screen.
- Select the [Show more settings] link.
- Type adminsettings in the Find a Setting field.
- Enter and confirm a password to grant administrator access on this computer; select the [OK] button. (This username and password is associated with the administrative account for the user’s Read&Write subscription.)
- Select the [Select your features] tab and then select which feature(s) to enable on the student’s toolbar.
- Select the Use Exam Mode now toggle to start Exam Mode.
- Close the Read&Write menu to start the exam.
WordQ+SpeakQ (WordQ5)
To minimize security risks, WordQ+SpeakQ (WordQ5) includes an Exam Mode feature, which can be enabled through the application’s settings. Note the following about Exam Mode:
- It must be set for a minimum of 1 hour and a maximum of 12 hours.
- Exam Mode may not eliminate all security risks.
- Once Exam Mode has been set, it cannot be disabled until the configured time has run out or the device has been rebooted.
Take the following steps to turn on Exam Mode and set the timer:
- Open WordQ+SpeakQ (WordQ5).
- Select the [Options] icon.
- Select [Exam Mode]; the EXAM MODE pop-up window appears.
- Set the exam time limit in the Exam Mode time limit field at the bottom of the window.
- Check or uncheck the Word usage examples and Single words added by the user, including topic words boxes to enable or restrict these features.