Practicing Remote Administration
Recommendations to Prepare for Testing
To have the best experience with testing, it is recommended that you, as the TA, run at least two practice sessions with students. The first session can be set up using a video meeting application, with students using the web-based version of the Student Testing Interface. The second session can be set up with students using the secure browser.
However, each class is different. Students should practice logging on and becoming familiar with the communication tools until they are comfortable with the testing interface. This allows students to concentrate on the operational assessments during the actual testing window and not get distracted by the resources and tools available for use.
Why Two Practice Sessions?
By completing at least two sessions, students and TAs can become comfortable with logging on to a test session remotely and using the widgets in the Student Testing Interface.
During the first practice, students can stay on the video session as the TA guides them through logging on, testing the camera and microphone, and using the widgets. Provide a video meeting link to students with a set date and time for the practice session and prepare the session before the meeting with students, to save time.
During the second practice, students need the test session ID and their SSIDs. Because students use the secure browser to log on, students are not able to communicate with the TA until they have entered the actual practice test. This works the same way when they take the actual assessments. Prior to running the second practice test session with students, provide students with their SSIDs. Refer to the SSIDs subsection for recommended ways of providing the SSID in a way that keeps it confidential.
First Practice Session
The purpose of the first practice session is so the TA can coach students through the logon process using videoconferencing tools. When the student has logged on successfully, the session can be ended (or the student can finish the practice test, whichever feels more appropriate to the TA).
Although students use the standard secure browser during the actual assessment, for the purposes of this first practice test session, students should use the web-based version of the student interface. This allows students to join a video meeting while testing.
Have all students join a video meeting (such as Zoom, Google Meet, etc.). Talk students through the logon process in the video meeting.
Refer to the Signing Students In to the Practice Session subsection for the five steps the students take to log on to an assessment.
Second Practice Session
After a student has had a chance to sign in to an assessment while in a video meeting, the student should try to log on using the standard secure browser application on the device. This practice session can occur on the same day as the first session or on another day.
All students should have the secure browser installed on their device prior to beginning a second practice session. Educators should confirm with the school’s technology coordinator that all students have the supported version of the secure browser installed. A student using a personal device can follow the instructions on the Secure Browsers web page to download the application.
Because the secure browser does not function when other applications are running, students cannot be in a video meeting while the secure browser is running.
Preparing the Test Administrator
Take the following steps to administer the second round of practice tests:
- Log on to the Test Administrator and Test Examiner Practice and Training Site.
-
Select the [Start a Remote Session] button (figure 1), and then select a practice or training test type and any subsequent levels.
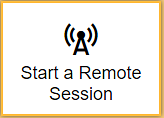
Figure 1. [Start a Remote Session] button
- Select the [Start Practice Session] button.
-
To initiate the remote tools, select the I agree checkbox in the communication widget (figure 2) and select the [Allow] button.

Figure 2. Permission box for remote tools
- Save the session ID to provide to students prior to testing.
Approve the students and admit them into the assessment after they have logged on successfully. As students enter the assessment, they also appear on screen in a section of the Test Administrator Interface.
Keep the video meeting open in case a student is unable to enter the assessment. A student can reenter the video meeting for technical assistance or to ask questions.
Signing Students In to the Practice Session
To assist students with this logon, start a video meeting with students and provide the test session ID.
Ask students to turn off their cameras in the video meeting. The remote tools cannot function if the camera is on in a program other than the practice tests and training tests.
Students will then need to leave the meeting and close any running applications.
Step 1: Signing Students In
To begin, a student should open the secure browser and then enter their first name, SSID, and provided test session ID before following the same steps used when logging on with the TA in the first practice session.
To sign students in to a test session:
-
The student launches the secure browser on a testing device. The Student Sign-In screen appears (refer to figure 3).
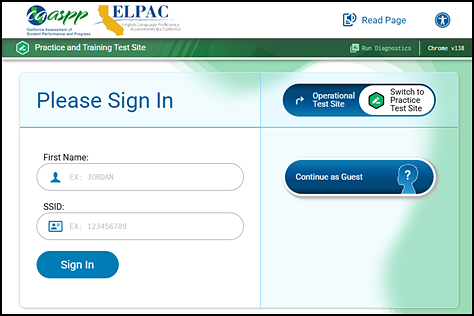
Figure 3. Practice test Student Sign In screen
- The student enters their name into the First Name field as it appears in TOMS and then their SSID.
- The student selects the [Sign In] button.
Step 2: Verifying Student Information
After students sign in, the Is This You? screen appears (figure 4). The student verifies their personal information on this screen.
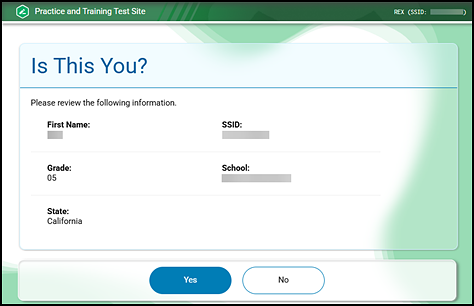
Figure 4. Practice test Is This You? screen
To verify personal information:
- If all the information is correct, the student selects [Yes].
- If any of the information displayed is incorrect, the student must not proceed with testing. The student should select [No]. Notify the site CAASPP coordinator that the student’s information is incorrect.
Step 3: Entering a Session ID
After students verify their information, they must enter the session ID provided by the test examiner in the Session ID field on the Login Session screen and then select [Join Session] (figure 5).
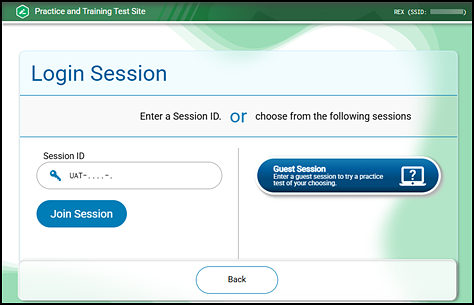
Figure 5. Session ID field on the practice test Login Session screen
The Your Tests screen appears (figure 6).
Step 4: Selecting a Test
The Your Tests screen displays all the assessments a student is eligible to take (refer to figure 6). The student can only select assessments that have been selected by the TA.
In a practice test session, the student first selects the arrow next to the test name, and then selects the assessment.
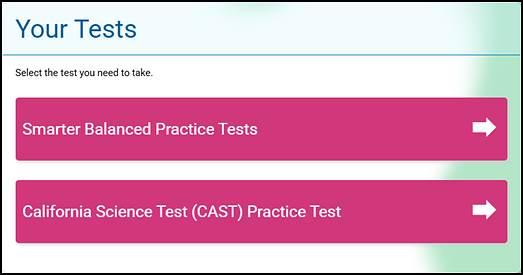
Figure 6. Practice test Your Tests selection box
To select an available assessment:
-
The student selects the required test name. The request is sent to the TA for approval, and the Waiting for Approval screen appears (figure 7).
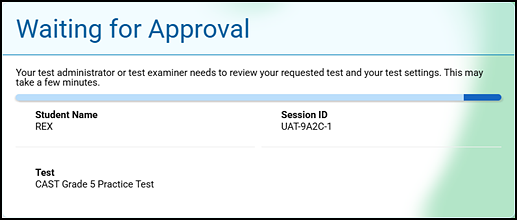
Figure 7. Practice test Waiting for Approval screen
- Take this time to assist students and ensure that all students have the same screen displayed on their monitors.
- If a student’s required assessment is not displayed, the student should select [Cancel Request]. Verify the test session includes the correct assessments and add additional assessments, if necessary.
- Once all students are waiting for approval, approve these students in the same manner used during the operational assessments.
Step 5: Sound and Video Check
Camera Check
During the camera check, students should follow the TA’s instruction and not move ahead. A student takes the following steps to check a camera:
- The student completes the Audio/Video Checks screen by selecting the I agree to grant the browser permission to access the camera checkbox and then selecting the large [Camera] icon. If the student’s browser uses a pop-up message to confirm that the student allows the program to use the camera and microphone, the student should select the [Allow] button.
-
The student’s camera should turn on and display the student’s image on the screen (figure 8). The student can complete the video check by selecting the [I see myself] button.
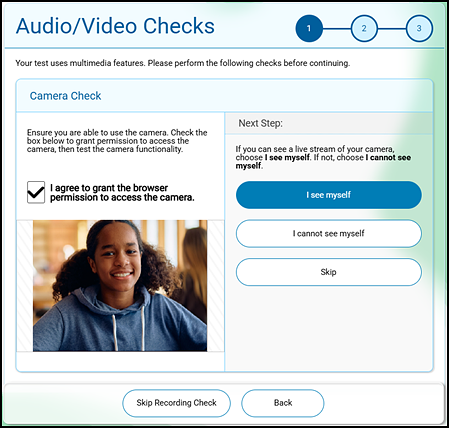
Figure 8. “Camera Check” section of the Audio/Video Checks screen
Recording Device Check
The “Recording Device Check” section of the Audio/Video Checks screen appears if a student has the speech-to-text setting or is testing remotely. On this screen, the student’s voice is recorded, and the student verifies that the recorded audio is heard.
A student takes the following steps to check a microphone in the “Recording Device Check” section (figure 9):
- The student selects the [Recording] microphone [
 ] icon and speaks to record.
 - The student selects the [Stop] square [
 ] icon to stop recording.
 - The student selects the [Play] arrow [
 ] icon to listen to their recorded audio.
- If the recorded audio is clearly audible, the student selects [I heard my audio]. A green check appears at the upper-right corner of the panel and the student can proceed.
- If the recorded audio is not clearly audible, the student selects [I did not hear my recording] to open the Problem Recording Audio panel.
- If the student still cannot hear their recorded audio clearly, the student can select [Try Again] to return to “Recording Device Check” and retry.
- The student can select [Select New Recording Device]—which only appears for students testing on computers or tablets with multiple recording devices—to open the Recording Input Device Selection panel and select a different recording device.
-
If the student’s browser asks for permission for the microphone to be used, the student should select the [Allow] button.
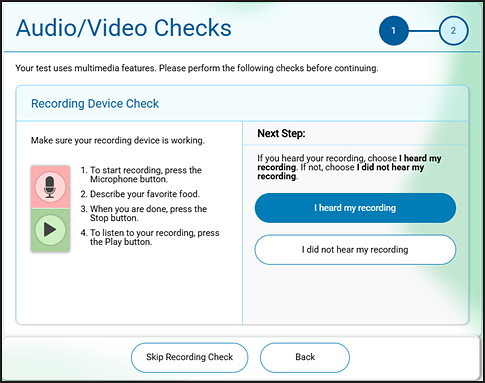
Figure 9. “Recording Device Check” section of the Audio/Video Checks screen
If the student can hear the recording, the student selects the [I heard my recording] button.
Audio/Video Check
The next section of the Audio/Video Checks screen is the “Sound and Video Playback Check. section (figure 10).

Figure 10. “Sound and Video Playback Check” section of the Audio/Video Checks screen
To check audio and video settings:
- The student plays the video and listens to the audio by selecting the [Play] arrow [
 ] icon.
 - Depending on the sound and video quality, the student does one of the following:
- If the student can see the video and hear the sound, the student selects [I could play the sound and video]. A green check appears at the upper-right corner of the panel and the Instructions and Help page appears.
- If the student cannot see the video and hear the sound, the student selects [I could not play the sound or video]. The Audio/Video Playback Problem panel appears, giving students two options:
- A student can select [Try Again] to return to “Sound and Video Playback Check.”
- A student can select [Log Out]. Either troubleshoot the device and headphones or move the student to another device with working audio and video.
Text-to-Speech Check
The final check is for the “Text-to-Speech Sound Check. section of the Audio/Video Checks screen (figure 11), which appears if a student has the text-to-speech designated support assigned. On this section of the screen, the student verifies that text-to-speech is working properly on the student’s device. A student can only use text-to-speech within a supported secure browser.
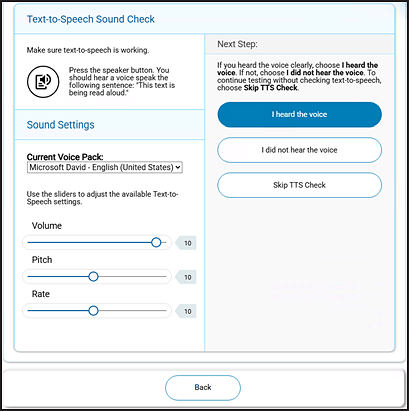
Figure 11. “Text-to-Speech Sound Check” section of the Audio/Video Checks screen
To check text-to-speech functionality:
- The student selects the [TTS Speaker] speaker [
 ] icon and listens to the audio.
- If the voice is clearly audible, the student selects [I heard the voice]. A green check appears at the upper-right corner of the panel and the student can proceed.
- If the voice is not clearly audible, the student adjusts the settings using the sliders and selects the [TTS Speaker] icon again.
- If the student still cannot hear the voice clearly, the student selects [I did not hear the voice] and closes the secure browser. Work with the student to adjust audio or headset settings (for more information, refer to the subsection Troubleshooting Issues). The student can sign in again when the issue is resolved.
To continue without testing text-to-speech, the student selects [Skip TTS Check].
Step 6: Viewing Test Instructions and Starting the Test
The Instructions and Help screen is the last step of the sign-in process (refer to figure 12). A student may review this page to understand how to navigate the assessment and use test tools.
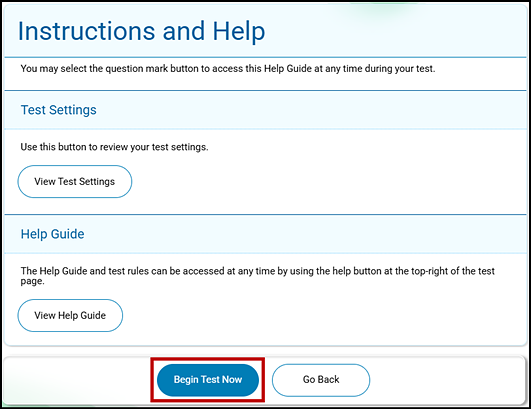
Figure 12. Instructions and Help screen
To begin the assessment, the student selects [Begin Test Now] (indicated in figure 12). The test opportunity officially begins or resumes.
Practicing Using the Remote Widget
Once in the assessment, two conversation bubbles appear in the lower-right corner of the student’s screen. This allows a student to view what is being shown to the TA. If the student selects the circle, the remote widget expands and offers other tools (figure 13).

Figure 13. Remote widget
Test out the different tools in the communication widget with students.
Screen Share
Use the screen share feature to view a student’s screen during the test session. This is a one-way feature that only TAs can initiate by selecting the [screen share] icon. The student needs to grant the TA permission by selecting the [I agree] box and [Allow] button on the widget. Once the student grants permission, a red dotted line appears around the student’s screen indicating that the TA can now see the screen.
Refer to the Screen Share View subsection for information about using this feature.
Messaging Tool
If a student selects the [raise hand] hand icon, the student’s information moves to the top of the page under the “Tests with potential issues” section of the Test Administrator Interface. Select the [lower hand] icon, individually message the student, or enter into a video and audio chat with the student. The student is not able to interact with the assessment when the widget is expanded. The widget must be minimized for the student to return to the assessment.
Chat Tool
The student may also select the [Messages] speech bubble icon to send an individual chat message to the TA. A student with unread messages remains in the “Tests without issues” section of the Test Administrator Interface but has a red [Message] icon in the student’s information column.
Ending the Practice Session
Once students are comfortable with the tools, they should select the [Pause] button at the top left of the screen (indicated in figure 14). Students then select [Yes] to leave the assessment.
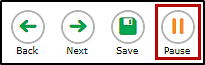
Figure 14. [Pause] button
Once all students have paused their assessments, select the [Stop] button to end the test session. Logging off the Test Administrator Interface is now possible.