Detailed Instructions for Smarter Balanced for ELA and Mathematics Interim Assessment Administration
Step 1. (Optional) Prepare Student Logon Cards
Each student will log on to the TDS via a secure browser or standard web browser using the student’s first name, SSID, and a test session ID.
- Prior to starting a test session, the test administrator should have a record of each student’s first name and SSID. To begin a test, a student must enter a first name exactly as it appears in TOMS (including special characters), which will come from the first name or preferred first name fields in CALPADS.
- Print or write each student’s first name and SSID on a card or piece of paper and distribute the card or paper to each student just prior to testing to help the students type the logon information accurately. Cards or papers may include additional information to ensure students are properly identified. This additional information may include a student’s last name, birth date, or picture.
Step 2. Access the TA Interface
Select the [Test Administrator Interface for All Online Tests] button (figure 1) to select tests, start a test session, approve students for testing, and monitor student progress during testing.
-
Go to the CAASPP website and select the [Test Administrator Interface for All Online Tests] button (figure 1).
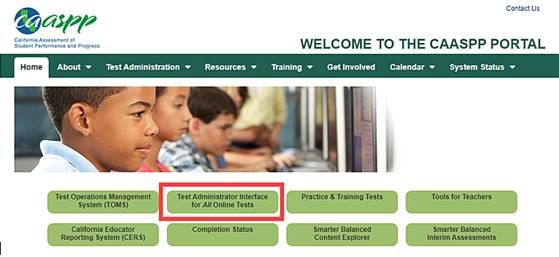
Figure 1. [Test Administrator Interface for All Online Tests] button
-
Log on by entering the username (email address) and password on the Logon screen (figure 2) and then selecting the [Secure Logon] button.
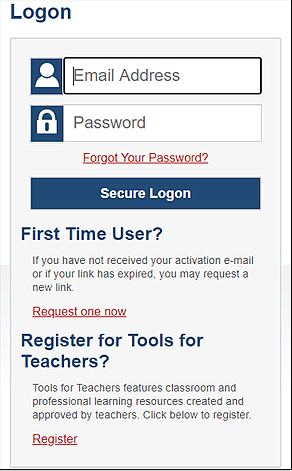
Figure 2. Logon screen
Step 3. Select Interim Assessments
-
Select the type of test. After selecting the test category Smarter Balanced Interim Assessments, the ICAs and IABs (including Focused IABs) test selection tree appears. The test selection tree can be further expanded by selecting the plus (+) sign and collapsed by selecting the minus (−) sign (indicated in figure 3).
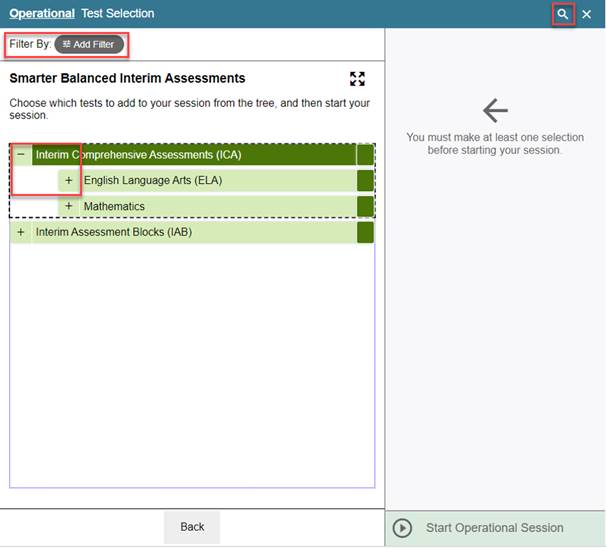
Figure 3. Select the type of test
-
The search feature can be used to search for tests using their specific names. Select the [Search] magnifying glass icon [
 ] indicated in figure 3. Enter the full or partial test name and select the [
 ] button. Figure 4 shows a sample search for tests matching the search term “Geometry.” Note all of the grade levels are available for testing.
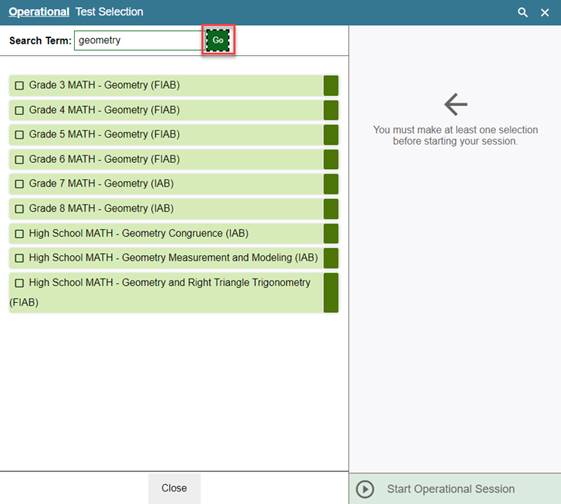
Figure 4. Sample search results
-
Additionally, the filter feature can be used to filter available tests by grade level and subject associated with the tests. Select the [Add Filter] button [
 ] (indicated in figure 5) to access the filter panel. Expand the available filter categories, check the criteria to filter (i.e., All Grade 3 Tests), and select the [Apply Filter(s)] button [
 ]; remove the filter by selecting the [Remove Filter] “X” icon [
 ] (figure 5).
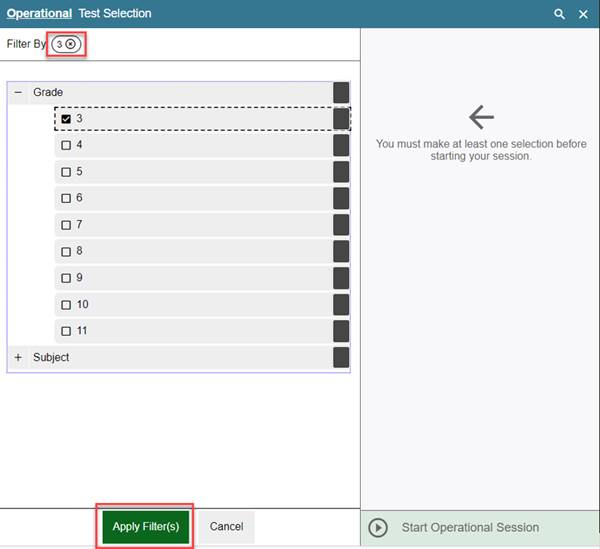
Figure 5. Sample filter panel
-
Select the appropriate content area and test for the class or student(s) being tested in the session. Use the same method stated in step 1 for expanding and collapsing the test selection tree. Selected tests will show a box with a check mark [
 ] and appear in the panel on the right under “Tests Selected.” In figure 6, Grade 4 ELA - Interim Assessment (ICA) has been selected.
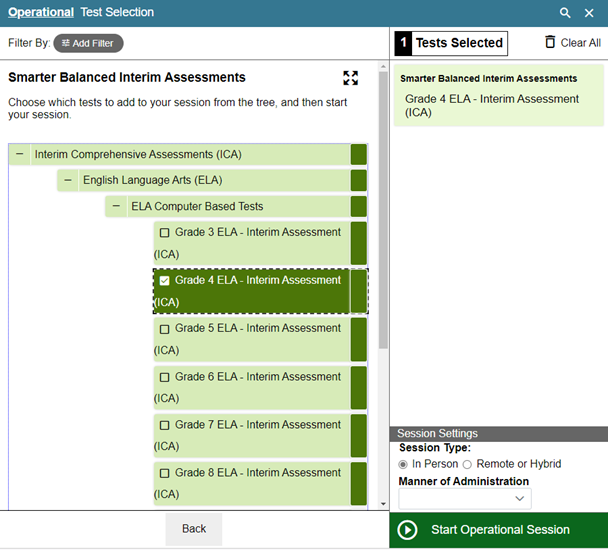
Figure 6. Select a content area and grade level
-
If more than one test needs to be administered during the same test session, repeat steps 1 and 2 to select multiple tests (figure 7). Be sure students are informed of the test(s) students are intended to take during this session. Selecting too many tests for a test session may result in confusion among the students regarding which is the intended test.
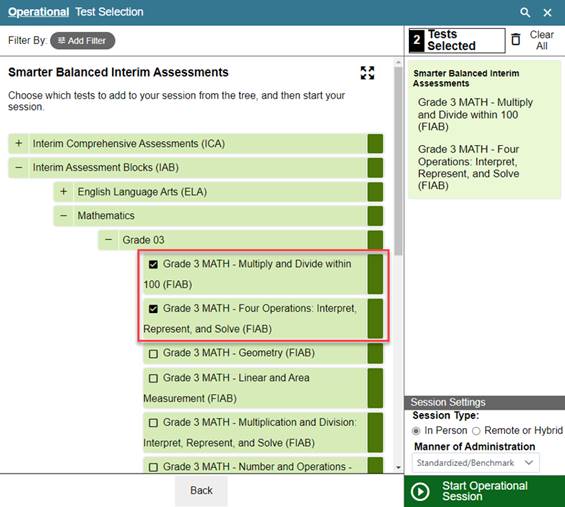
Figure 7. Multiple tests selected
-
Select session type for in-person or remote testing (figure 8). This setting is used to indicate whether students are being tested in a classroom setting using the secure browser or testing remotely using the secure browser or Student Testing Interface.
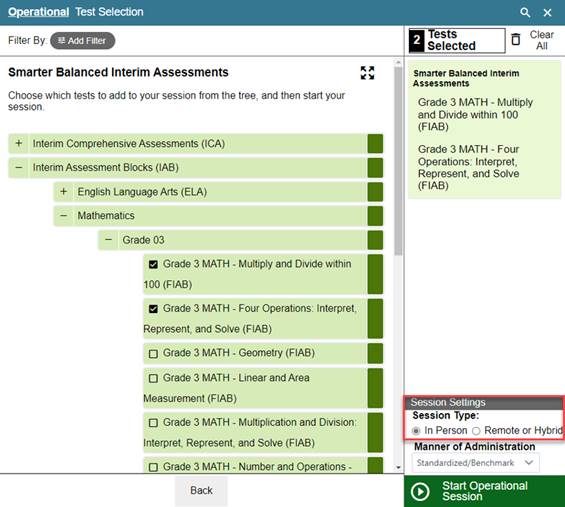
Figure 8. Select session type
- Set the manner of administration in the Manner for Administration drop-down list (figure 9). This setting is used to indicate whether an administration of an interim assessment will be standardized. This setting must be selected when administering any IAB, Focused IAB, or ICA. The interim assessment for a student should be marked Standardized/Benchmark only if a valid interpretation of results can be made. The exact criteria for selecting the Standardized/Benchmark option for a student is determined locally. Factors to consider include, but are not necessarily limited to, the extent of the following:
- The student has previously been exposed to the interim assessment items or form taken.
- The interim assessment was administered in a consistent manner across time. Educators and others who make inferences on the basis of test results should have received adequate training in administering the interim assessments and in interpreting results.
- A student with disabilities took the interim assessment in a manner consistent with the accessibility resources (e.g., designated supports or accommodations) identified in the student’s IEP or Section 504 plan and in a manner consistent with how the student performs work in class.
- A student identified as an English learner took the interim assessment with the necessary accessibility resources identified for use with statewide or classroom assessments.
Please note that the Manner of Administration setting can be overridden for individual students. Refer to the Override the Manner of Administration Session-Level Setting for an Individual Student subsection for more information.
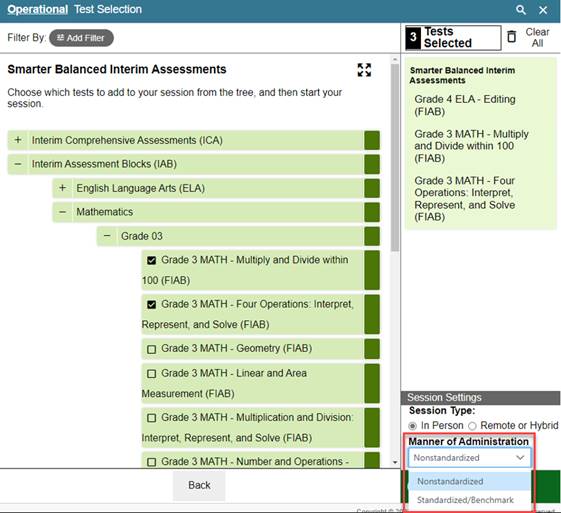
Figure 9. Set the manner of administration
-
Select the [Start Operational Session] button (figure 10). This will start the test session.
![[Start Operational Session] button](/s/interim-assessments/ia-administration/detailed-instructions/2023-clip_image031.jpg)
Figure 10. [Start Operational Session] button
Step 4. Generate the Session ID
Interim assessment test administrators must inform students of the test session in which students are participating. The system-generated session ID appears in the top-left corner of the screen (figure 11).
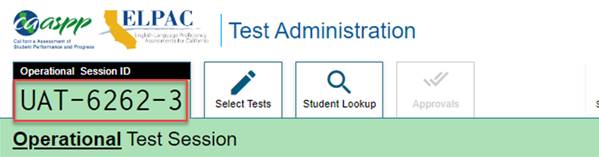
Figure 11. Session ID
Test administrators should write the test session ID on the board or another place where students can access it. The test session ID must be entered as it is written, without extra spaces or characters; in figure 11, this is “UAT-6262-3.” Make sure to retain the session ID until testing is complete.
The test administrator may add additional interim assessments to a session. Additional tests can be added to an existing session ID by selecting the [Select Tests] tab to the right of the session ID number.
After selecting additional interim assessments, test administrators confirm their selection by selecting the [OK] button in the Test Addition message box (figure 12). Once selected, the added assessment will be available for student use.
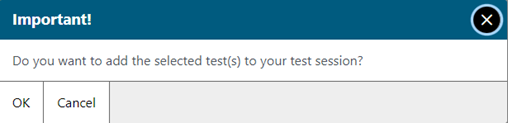
Figure 12. Test Addition message box
Step 5. Students Sign On to the Session and Select the Assessment
Once the test administrator has generated the session ID, students can sign on to the TDS using the secure browser or the web-based Student Testing Interface if the session is being administered remotely.
Steps for Student Logon:
- The student launches the secure browser or standard web browser.
- Each student will sign in with the following information (figure 13):
- First Name
- SSID
- Session ID
-
The student selects the [Sign In] button.
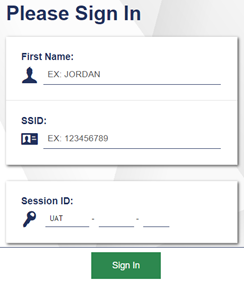
Figure 13. Please Sign In screen
-
On the Is This You? screen, the student verifies the first name, SSID, grade, school, and state (figure 14).
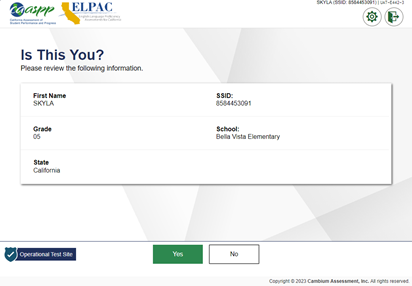
Figure 14. Is This You? screen
-
If the student information is correct, the student selects the [Yes] button. If not, then the student selects the [No] button.
-
The student selects the appropriate test from the available tests presented on the Your Tests screen (figure 15). The test administrator should make only the necessary tests available to select. The test administrator should direct students to select the correct test by pointing out the content area “ELA” or “Mathematics” and the test type “Interim Test (ICA),” “Performance Task (ICA),” IAB, or Focused IAB.
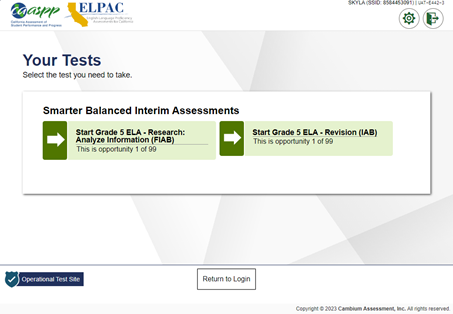
Figure 15. Sample of the Your Tests screen
-
The student waits until the test administrator approves the request (figure 16).
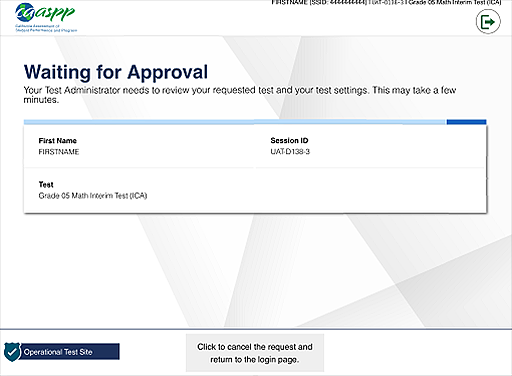
Figure 16. Waiting for Approval pop-up window
Step 6. View and Approve Student Test Selection and Settings
Before approving the student for the assessment, the test administrator must
- verify that each student has selected the correct interim assessment;
- optionally override, or change, the session-level Manner of Administration setting for an individual student; and
- verify that the student has the appropriate test settings—also called accessibility resources—available.
After students log on and select an assessment, the test administrator approves each student to begin the assessment (figure 16).
Overview of the Approvals and Student Test Settings Screen
Figure 17 contains numbered callouts on a screen capture of the Approvals and Student Test Settings screen. The numbers and screen elements they identify follow the image.
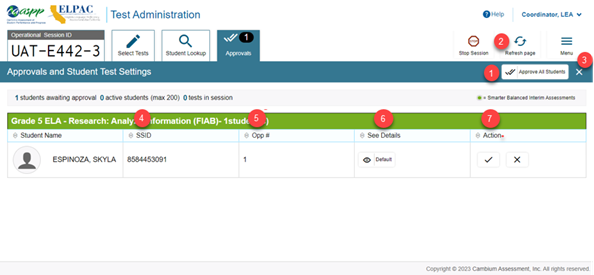
Figure 17. Approvals and Student Test Settings screen
- [Approve All Students] button: This button allows the test administrator to approve all students presently awaiting approval.
- [Refresh Page] button: This button updates the table of students awaiting approval.
- [Done] button: This button closes the Approvals and Student Test Settings screen.
- SSID: This column displays the student’s SSID.
- Opportunity number (Opp #): This column displays the current number of attempts made by the student on this particular assessment.
- See Details: This column indicates whether the student is using either the default or custom accessibility settings. The [View] icon [
 ] can be used to view and set individual student accessibility settings and override the Manner of Administration setting designated at the test session level (refer to the Override the Manner of Administration Session-Level Setting for an Individual Student subsection for details).
 - Action: Select a button to perform an action: selecting the [Approve] icon [
 ] approves the student’s test request, and selecting the [Deny] icon [
 ] denies the student’s test request.
Verify the Correct Assessment
Once students begin requesting entry to a test session, the [Approvals (#)] tab will become available (figure 19). The number of students awaiting approval is indicated by the number in the blue circle within the [Approvals (#)] tab.
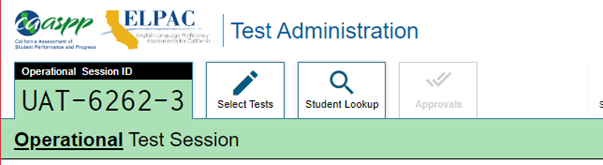
Figure 18. No students awaiting approval
In figure 18, the [Approvals (#)] tab is not visible because there are no students awaiting approval.
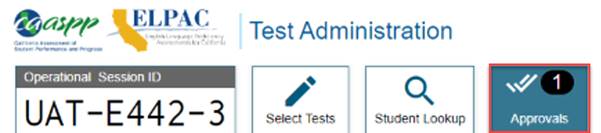
Figure 19. Students awaiting approval
In figure 19, the [Approvals (#)] tab is visible, and the [Approvals (#)] tab says [Approvals (1)]. The number in the circle indicates the number of students awaiting approval.
To view the Approvals and Student Test Settings screen (figure 20), select the [Approvals (#)] tab. The Approvals and Student Test Settings screen displays a list of students awaiting approval to start testing. The test name is in the green bar atop the table. In figure 20, there is a single student awaiting approval.
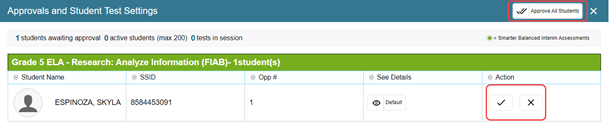
Figure 20. Approvals and Student Test Settings screen
Override the Manner of Administration Session-Level Setting for an Individual Student (Optional)
To change the manner of administration for an individual student, select the [View] icon [ ] to display the student Test Settings screen (figure 21).
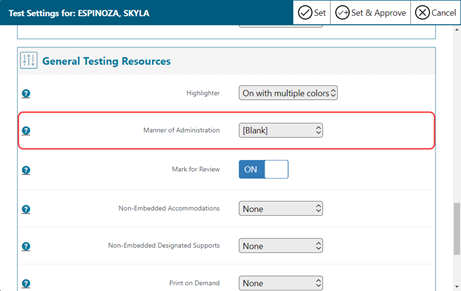
Figure 21. Student Test Settings screen
This setting is applied only to interim assessments. Only set the Manner of Administration on this page to select an option for this student that is different from what was previously selected for the test session.
Verify Student Accessibility Resource Settings
If a student’s default test settings have not been preset in TOMS, the student is automatically assigned the default for the test being administered. It is important to note that the default settings can vary by test. Only the test settings available for that test will be displayed on the Approvals and Student Test Settings screen for that student.
The Approvals and Student Test Settings screen displays each student who is awaiting approval for entry to a test session. The test administrator can view and verify each student’s accessibility resource settings by selecting the [View] icon [ ] for that student (figure 22), which opens the Test Settings screen (figure 23).
![[View] icon](/s/interim-assessments/ia-administration/detailed-instructions/2023-clip_image062.png)
Figure 22. [View] icon
After the test administrator ensures that each student’s accessibility resources are set correctly, then the administrator can select one of three options, which are described following figure 23:
![Test Settings screen for [Student Name]](/s/interim-assessments/ia-administration/detailed-instructions/2023-clip_image064.png)
Figure 23. Test Settings screen for [Student Name]
- Select the [Set] button to set the accessibility resources and close the Test Settings screen.
- Select the [Set and Approve] button to set the accessibility resources, close the Test Settings screen, and approve the student for testing.
- Select the [Cancel] button to close the Test Settings screen without saving changes.
For more information about student assessment accessibility resources, view the Student Accessibility Resources subsection.
Approve or Deny Student Entry to the Test Session
The test administrator must verify that each student is taking the correct test, has the correct setting for the manner of administration, and has the correct accessibility resource settings. If all three of these are correct, then the test administrator will select the [Approve] icon [ ] (figure 24) for that student.
If all three criteria are true for all of the students awaiting approval, then the test administrator may select the [Approve All Students] button (figure 24) to approve all students with a single selection.
If a student selected the wrong test, then the test administrator should select the [Deny] icon [ ] for that student (figure 24). The student will be logged off and will need to start the process over to select the correct test. Some common examples of test selection errors are as follows:
- The student selected an ICA instead of an IAB.
- The student selected a mathematics test instead of an ELA test or vice versa.
-
The student selected a summative assessment instead of an interim assessment.

Figure 24. Approve or deny students
Although test administrators can approve all students at the same time, students must be individually denied entry into the test session.
After selecting the [Deny] icon [ ], the test administrator will be prompted to provide a reason for the denial (figure 25). This is optional but recommended. The student will then be logged off and directed to the Sign In screen.
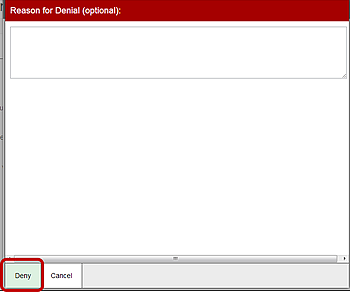
Figure 25. Reason for Denial text box
Once test session entry and the student’s test settings are approved, the student can access the Your Tests screen (figure 27).

Figure 26. Your Tests screen
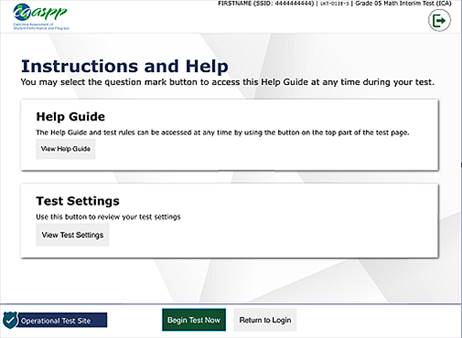
Figure 27. Instructions and Help screen
Step 7. Monitor Student Progress
Test administrators can monitor student progress by using the Students in Your Operational Test Session screen (figure 28). This screen allows the test administrator to view the test on which each student is working, the number of test items responded to, and the present status of the assessment.
Operational Test Session
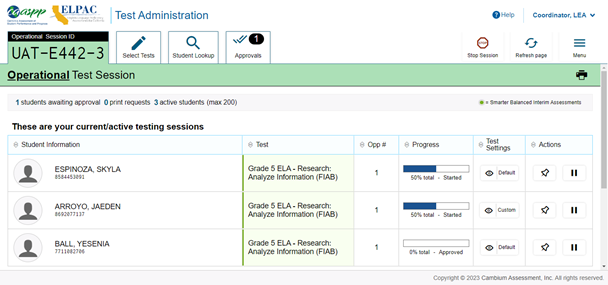
Figure 28. Students in Your Operational Test Session table
Table 1 describes the information displayed in the Students in Your Operational Test Session screen for each student in the test session.
| Column | Description |
|---|---|
| Student Information | The first and last name of the student in the session (as populated in CALPADS and TOMS) and the SSID associated with the student (from CALPADS) is shown. |
| Test | The name of the test the student is taking is shown. |
| Opportunity Number (Opp #) |
Each student’s record indicates the opportunity number for that student’s subject test. Each student has three opportunities for ICAs and an unlimited number of opportunities for IABs. |
| Progress | A progress bar shows the percentage of the test completed. |
| Test Settings |
Each student’s test will display one of the following settings:
The [View] icon [ |
| Actions |
Select the [Pause] button to pause a student’s test. The student will be logged off. Select the [Pin] button [ When a student requests a printout of a reading passage or other test material using the print-on-demand accessibility resource, a [Print] icon [ |
 ] displayed in this column is selectable. Select the icon to view a student’s test settings.
 ] to bring specific tests into focus at the top of the screen during test session monitoring. The "pin" feature allows test administrators and examiners to bring specific tests into focus at the top of the screen during test session monitoring. This might be useful if a student needs extra time, has issues with focus, or has experienced technical issues during testing.
 ] will appear in this column. Select the [Print] icon to review and authorize or deny the student’s request.
Student Test Status Types
Table 2 describes the statuses that appear in the Status column (figure 29) in the Students in Your Operational Test Session table. The status types in the table are listed chronologically as displayed during the testing process.

Figure 29. Status column
| Status | Description |
|---|---|
| Approved | The test administrator has approved the student for the session, but the student has not yet started or resumed the test. |
| Started | The student has started testing. The progress bar shows the percentage of the test completed. It does not indicate which item or item page the student is actively viewing. |
| Review | The student has answered all items and is currently reviewing those answers before submitting the test for scoring. A test with a “Review” status occurs only at the end of the test. A test is not “Completed” until the student submits the test. |
| Completed | The student has submitted the test. No additional action can be taken by the student. |
| Submitted | The test has been submitted for scoring, and final scores will be transmitted to CERS. |
The status types described in table 3 may appear when a student is listed in the Students in Your Operational Test Session table but is not actively answering items.
| Status | Description |
|---|---|
| Denied | The test administrator denied the student entry to the session. If the student attempts to enter the session again, this status will change to “Pending” until the test administrator approves or denies the student. |
| Paused |
The student’s test is currently paused. The following scenarios will result in a paused status:
The time listed with this status indicates how long the student’s test has been in the paused status. |
| Pending | The student is awaiting test administrator approval for a new test opportunity. |
| Suspended | The student is awaiting test administrator approval to resume a test opportunity. |
Pause a Student’s Test
Test administrators can pause an individual student’s test using the [Pause Test] button in the Students in Your Operational Test Session table (figure 30).

Figure 30. [Pause Test] button
Students whose tests are paused will be logged off and returned to the Sign In screen. If a student wishes to reenter the session, the student will need to log on and proceed through the approval process again. If the session has been stopped, the student will need to obtain a new session ID to resume testing.
To Pause an Individual Student’s Test:
- In the Pause Test column, select the [Pause] icon [
 ] for that student.
 - Select the [Yes] button to confirm that the student’s test should be paused.
In the event that a student is taking an incorrect assessment, the test administrator can pause the student’s test. The test administrator should then instruct the student to log off and log on again to select the correct test.
Screen Saver Mode
The Students in Your Operational Test Session table often contains PII, such as SSIDs. The TA interface has a new built-in screen saver to hide this data from view. The screen saver will automatically turn on after five minutes of inactivity and can be turned on manually as well.
-
To turn on the screen saver, select the [Menu] icon [
 ] (indicated in figure 31).
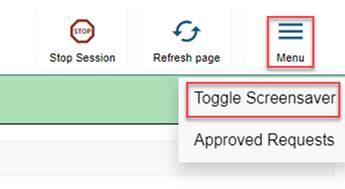
Figure 31. Menu Icon
-
The screen saver will automatically turn off if any mouse or keyboard activity is detected. It will also turn off automatically if the test session times out because of test administrator or student inactivity. The screen saver displays the session ID, any notifications if students are awaiting approval, whether there are pending print requests, or whether students require other interventions (figure 32).

Figure 32. Sample screen saver
Step 8. Stop or Log Off a Test Session
The various methods for stopping or logging off a test session, either intentionally or unintentionally, are as follows:
- Intentional Test Session Stop
- Intentional Test Session Logoff
- Unintentional Test Session Stop
- Unintentional Test Session Logoff
Intentional Test Session Stop
If the test administrator selects the large [Stop] button, this will automatically pause all tests in that session, and the students will be automatically logged off. Although tests can be resumed, the test session cannot be resumed unless it is a scheduled session.
-
Select the [Stop] button in the top portion of the screen (figure 33).
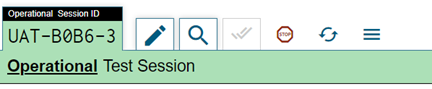
Figure 33. TA Interface Banner [Stop] button
-
An Important! pop-up message box will appear, requesting verification to end the session and log students off. Select the [OK] button to continue (figure 34).
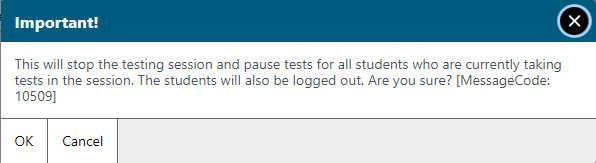
Figure 34. Important! pop-up message box
Users should exit or log off the TA Interface only after stopping the test session. Regardless of when or how users log off or navigate away from the TA Interface, student data will not be lost.
Intentional Test Session Logoff
To log off the TA Interface and all other SSO System applications, select the [Logout] button in the top-right corner of the screen. The session will be closed, and the screen will return to the CAASPP website after logoff. The test session will not be able to be resumed.
Unintentional Test Session Stop
If a test administrator accidentally closes the web browser while students are still testing, the session will remain open until it times out after 30 minutes. The test administrator may open the web browser and navigate back to the TA Interface, where the test administrator will be prompted to enter the active session ID.
Unintentional Test Session Logoff
In case of an unintentional logoff from the TA Interface while students are still testing, all in-progress tests in the session will be paused, and the status of the session will change to “closed.” The test administrator will need to log back on to the TA Interface, start a new session, and provide the new session ID to students who need to resume testing.