Configuring and Navigating Assessments with VoiceOver
Configuration
This subsection includes instructions for the additional VoiceOver configuration steps that must be followed before a student uses VoiceOver for online testing. To ensure VoiceOver is properly configured, students should take practice tests using VoiceOver before taking operational assessments. This subsection contains the instructions for the following tasks:
- Using the VO Key for VoiceOver Commands
- Configuring VoiceOver Screen Reader Navigation Settings
- Applying VoiceOver Settings for Contracted or Uncontracted Braille
Students cannot use VoiceOver for ELA assessments, as it cannot suppress the read-aloud of passages.
Using the VO Key for VoiceOver Commands
Take the following steps to specify which command should act as the [VO] key from the VoiceOver Utility screen:
- To turn on VoiceOver, press Command +[F5].
-
Press [VO] + [F8] to open the VoiceOver Utility screen (shown in figure 1).
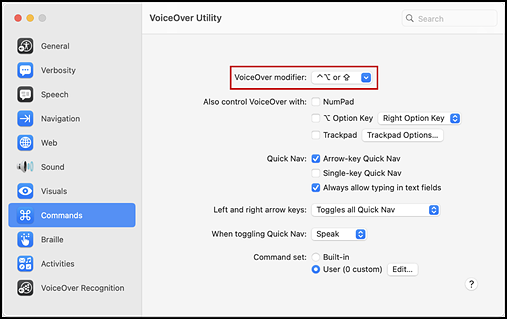
Figure 1. [Commands] button with the VoiceOver modifier option in the VoiceOver Utility screen
- In the left panel, select [Commands] (figure 1).
- From the VoiceOver modifier drop-down list that is indicated in figure 1, select the keys the student will use as the [VO] key:
- [Control] + [Option] (^⌥)
- [Caps Lock]
- Either [Control] + [Option] or [Caps Lock]
If [Caps Lock] is set as the [VO] key, a student who wishes to activate [Caps Lock] and type uppercase characters should quickly press [Caps Lock] twice.
Configuring VoiceOver Screen Reader Navigation Settings
VoiceOver allows students to use keyboard commands to navigate the Student Testing Site. For a better experience when using keyboard commands, take the following steps to enable the Quick Nav feature and other settings in the VoiceOver Utility screen.
- To turn on VoiceOver, press [Command] + [F5]
- Press [VO] + [F8] to open the VoiceOver Utility screen.
-
In the left panel, select [Commands] (shown in figure 2).
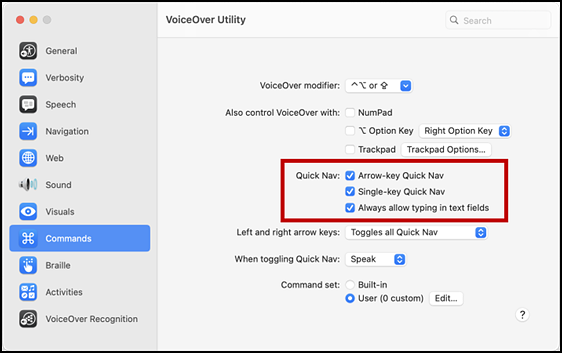
Figure 2. [Commands] button with Quick Nav options in the VoiceOver Utility screen
- In the >Quick Nav section (figure 2), make sure the following checkboxes are marked:
- Arrow-key Quick Nav
- Single-key Quick Nav
-
To ensure that the tab key functions properly when using VoiceOver in an assessment, select [Navigation] in the left panel (figure 3).
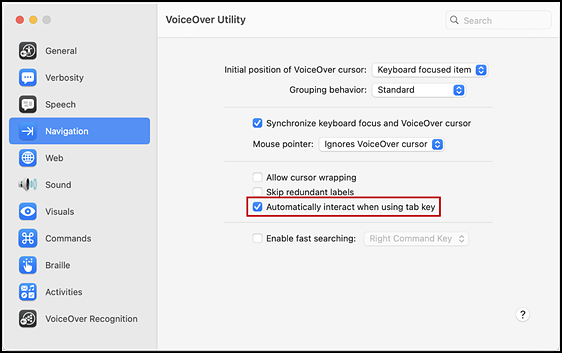
Figure 3. [Navigation] button with the tab interaction option in the VoiceOver Utility screen
- Make sure the Automatically interact when using tab key checkbox is marked (indicated in figure 3).
-
To ensure that VoiceOver interacts properly with websites, select [Web] in the left panel and then select the [Web Rotor] tab (figure 4).
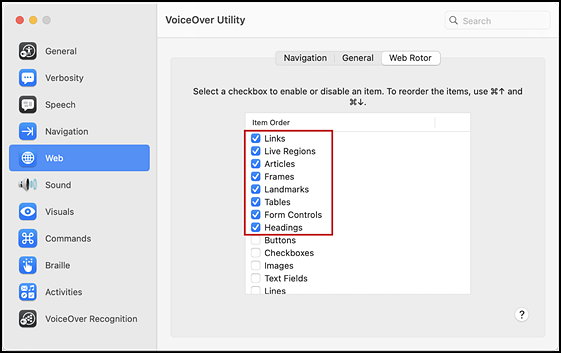
Figure 4. [Web] button with the [Web Rotor] tab in the VoiceOver Utility screen
- Make sure the following checkboxes in the “Item Order” list that is indicated in figure 4 are marked in the [Web Rotor] tab:
- Links
- Live Regions
- Articles
- Frames
- Landmarks
- Tables
- Form Controls
- Headings
- Web Spots (if present)
Applying VoiceOver Settings for Contracted or Uncontracted Braille
Take the following steps to apply the correct VoiceOver settings prior to launching the secure browser to enable the student to use contracted or uncontracted literary braille with an RBD:
- To turn on VoiceOver, press [Command] + [F5].
- Press [VO] + [F8] to open the VoiceOver Utility screen.
-
In the left panel, select [Braille] (figure 5).
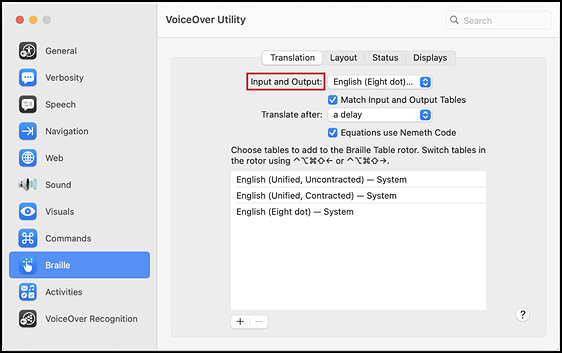
Figure 5. [Braille] button with the [Translation] tab in the VoiceOver Utility screen
- Take one of the following actions in the [Translation] tab:
-
Select the [Layout] tab (figure 6).
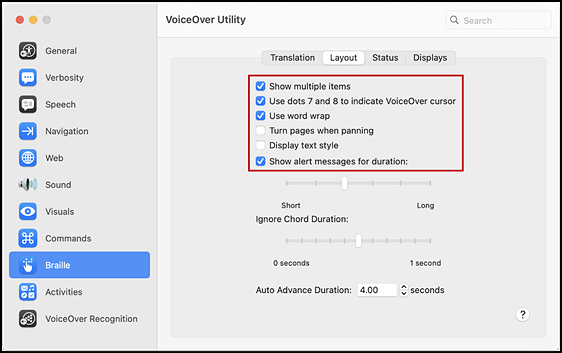
Figure 6. [Layout] tab in the Braille panel of the VoiceOver Utility screen
- Ensure the following boxes are checked in the [Layout] tab:
- Show multiple items
- Use dots 7 and 8 to indicate VoiceOver cursor
- Use word wrap
- Show alert messages for duration
Navigation
VoiceOver allows students to navigate assessments using keyboard commands. Some of these commands refer to the [VO] key. For more information about the [VO] key, refer to Using the VO Key for VoiceOver Commands.
Navigating the Sign-In Pages with VoiceOver Keyboard Commands
| Action | Keyboard Command |
|---|---|
|
Returns the focus to the secure browser if the student navigates to the VoiceOver application window while signing in (Keyboard layouts may vary by device. Please refer to the manual provided by the device manufacturer for more information.) |
[VO] + [F1] (×2) (Standard keyboard) |
|
Returns the focus to the secure browser if the student navigates to the VoiceOver application window while signing in (Keyboard layouts may vary by device. Please refer to the manual provided by the device manufacturer for more information.) |
[Space bar] + [S] (Perkins Braille keyboard) |
|
Moves the focus to the next field or button on the page |
[Tab] |
|
Moves the focus to the previous field or button on the page |
[Shift] + [Tab] |
|
Moves focus to interact with web content or elements |
[VO] + [Shift] + [Down] Arrow |
|
Stops interacting with web content or elements |
[VO] + [Shift] + [Up] Arrow |
|
Reads the next line or item on the page |
[VO] + [Right] Arrow |
|
Reads the previous line or item on the page |
[VO] + [Left] Arrow |
Navigating Test Pages with VoiceOver Quick Nav Keyboard Commands
| Action | Keyboard Command |
|---|---|
|
For hot text items, navigates to the next checkbox on the page |
[C] |
|
For hot text items, navigates to the previous checkbox on the page |
[Shift] + [C] |
|
Jumps to the next heading on the page; in general, the following test components are defined with a heading:
On test pages that have multiple questions, a student can jump directly from one question to the next. To do so, the student should press the [H] key and then press [VO] + [Right] arrow twice. The question prompt will then be read aloud. |
[H] |
|
Jumps to the previous heading on the page |
[Shift] + [H] |
|
Moves to next button on the page |
[B] |
|
Moves to previous button on the page |
[Shift] + [B] |
|
For multiple choice items, navigates to next answer choice |
[J] |
|
For multiple choice items, navigates to the previous answer choice |
[Shift] + [J] |
|
For equation items and text response items, navigates to the next text entry field (This command does not apply to text entry fields that have a formatting toolbar.) |
[F] |
|
For equation items and text response items, navigates to the previous text entry field (This command does not apply to text entry fields that have a formatting toolbar.) |
Shift] + [F] |
|
Moves to the next component on the page. In general, the following test elements are components:
|
[Tab] |
|
Moves to the previous component on the page |
[Shift] + [Tab] |
|
Selects a button or response option or opens a context menu or list item |
[Return] |
|
Moves to the next line on the page |
[VO] + [Right] Arrow |
|
Moves to the previous line on the page |
[VO] + [Left] Arrow |
|
Reads everything on the page (from the current point of focus) |
[VO] + [A] |
|
Reads everything from the top of the page to the current point of focus |
[VO] + [B] |
|
Opens Rotor, which used to interact with objects in the web area |
[VO] + [U] |
|
Stops VoiceOver from reading |
[Ctrl] |
Opening and Using Context Menus with VoiceOver Keyboard Commands
| Action | Keyboard Command |
|---|---|
|
Opens the context menu when VoiceOver reads “menu button” (This is one of two ways to open the context menu when streamlined mode is turned on.) |
[Return] |
|
Opens the context menu when VoiceOver reads “menu button” (This is one of two ways to open the context menu when streamlined mode is turned on.) |
[VO] + [Space bar] |
|
Moves the focus to the next option in the menu, which VoiceOver will read aloud |
[Down] Arrow |
|
Moves the focus to the previous option in the menu, which VoiceOver will read aloud |
[Up] Arrow |
|
Selects the menu option currently in focus |
[Space bar] |
|
Closes the context menu without selecting any options |
[Esc] |
Responding to Items with VoiceOver Keyboard Commands
| Action | Keyboard Command |
|---|---|
|
[Tab] |
|
Navigates to the previous answer option, text box, selectable text field, keypad button, or check box, depending on the item type |
[Space bar] + [Tab] |
|
Moves between each line of text in the item for edit task choice items (After a student opens an Edit task menu by pressing [space bar], the arrow keys can be used to move between the answer options in the drop-down list.) |
[Up] and [Down] Arrows |
|
[VO] + [Space bar]; or [Return] |
|
Opens a pop-up menu with special characters for equation items (A student can use the arrow keys to move between the special characters in the list and then press [VO] + [space bar] or [Return] to insert a special character in the response area.) |
[Option] + [7] |