Understanding the Student Testing Interface
This section is designed to familiarize test administrators with the Student Testing Interface. It describes what students can access and the tools students can access while taking the tests. This section will address some of the common questions test administrators and students may have.
This section covers the following:
- Test Layout
- About Test Elements
- Global and Context Menus
- Student Pause of Test
- Student Completion and Submission of the Test
Test Layout
The sample item page in figure 1 shows the primary features and tools available to all students.
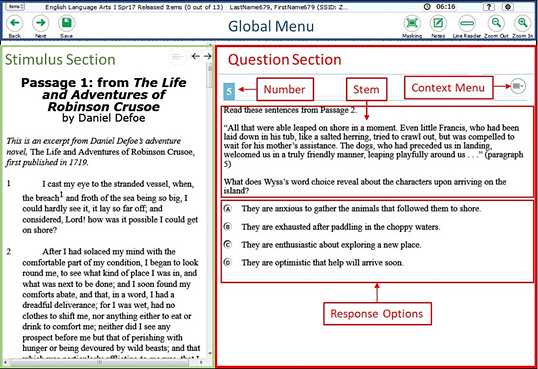
Figure 1. Sample Item page
About Test Elements
A test page has up to three elements: Global menu, Stimulus section, and Question section.
- Global: This menu contains the global navigation and test tool buttons. It also includes the Items menu, test information, [Help] icon [
 ], [Pause] button, and [System Settings] icon [
 ].
]. - Stimulus: The Stimulus section appears only for questions associated with a stimulus and contains the stimulus content, context menu, and [Expand/Collapse Passage] button (for ELA passages).
- Question: Each question and item section contains the following elements:
- Question number
- Question context menu
- Question stem
- Response area and response options
Global and Context Menus
The global and context menus allow students to access on-screen tools. These tools can be accessed using a mouse or keyboard shortcuts.
Global Menu
- The global menu (figure 2) contains the navigation buttons, the global test tool buttons, and the Items drop-down menu.
- Navigation buttons ([Back], [Next], [Save], [Pause], and [End Test]) appear on the left side of the global menu.
-
Test tool buttons (e.g., [Help], [System Settings], [Calculator], [Notes], [Line Reader], [Zoom Out], and [Zoom In]) appear on the right side of the global menu.

Figure 2. Sample global menu
-
The Items drop-down menu (figure 3) allows students to jump directly to an item the student has already viewed. The drop-down menu will show a flag icon (
 ) if an item has been marked for review and a triangle icon (
 ) if an item has been left unanswered.
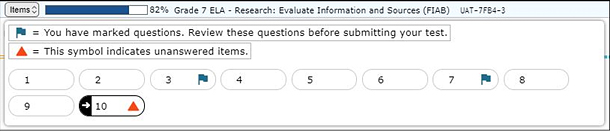
Figure 3. Sample Items drop-down menu
Open a Test Tool in the Global Menu:
Select the button for the tool (e.g., [Calculator]) to open a test tool in the global menu. Most tools will open in a pop-up window.
Use the [Zoom In] and [Zoom Out] Buttons in the Global Menu:
- To make text and images in the test larger, the student selects the [Zoom In] button. The zoom state persists until the [Zoom Out] button is selected. This can be done up to four times (levels). The global menu will not get larger.
- To make the text and images in the test smaller again, the student selects the [Zoom Out] button. This can be done up to four times (levels).
Open the System Settings Window and Adjust the Volume, Rate, or Pitch:
The student selects the [System Settings] icon [
 ] in the upper-right corner of the global menu next to the [Help] icon. The System Settings window (figure 4) will open.
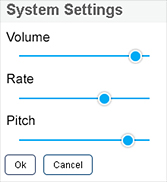
Figure 4. System Settings window
- The student moves the [Volume] slider to adjust the loudness of the audio, moves the [Rate] slider to adjust the speed of the speech, and moves the [Pitch] slider to adjust the pitch of the speech.
- The student selects [OK] to save the new volume, rate, and/or pitch setting for the remainder of the test.
Context Menus Overview
The student accesses tools such as text-to-speech, highlighter, and strikethrough using context menus. Context menus contain the options available for each different area on the test page. These areas are called elements.
Elements include passages or prompts, test items, and answer options (e.g., A, B, C, and D). Each answer option is a single element, and each element has its own context menu.
The context menu options vary depending on the following:
- The element type (i.e., passage or stimulus, item, or answer option)
- The tools available to students (e.g., text-to-speech is available only when using the secure browser)
Figure 5 shows an overview of the elements for multiple-choice and selected-response items, figure 6 shows a sample context menu for items, and figure 7 shows a sample context menu for answer options. Each answer option has its own context menu.
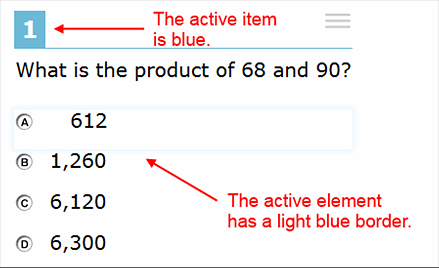
Figure 5. Overview of elements for multiple-choice and selected-response items
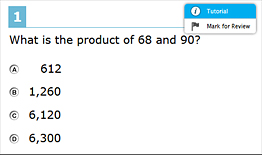
Figure 6. Sample context menu for items
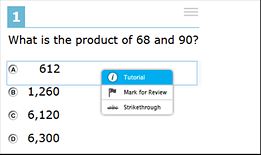
Figure 7. Sample context menu for answer options
Open a Context Menu for Passages and Items:
- The student selects the [Context Menu] icon (
 ) at the upper-right corner of the passage or item. The context menu will open and display the available tools.
 - Select a tool to activate or open it.
Open a Context Menu for Answer Options:
Students may use the [Context Menu] icon to view available tools for multiple-choice or multiselect answer options. A student may also select with a mouse or trackpad’s right mouse button.
The instructions to open the context menu for an answer option using the on-screen button differ depending on the device.
Mouse or trackpad
- The student selects an answer option so that it is “active” (a light blue border will appear around it). However, this will result in the answer option being selected until the student selects a different option.
- The student selects the [Context Menu] icon. The context menu will open.
- The student selects a tool to activate or open it.
Tablets
-
The student taps an answer option so that it is “active.” A light blue border will appear around an active answer option.
Caution: This will result in the answer option being selected until the student selects a different option.
- The student taps the [Context Menu] icon. The context menu will open.
- The student selects a tool to activate or open it.
The student opens the context menu for an answer option using the right mouse button:
Two-button mouse
- Using the right mouse button, the student selects anywhere on an answer option. The context menu will open.
- The student selects a tool to activate or open it.
Single-button mouse (for use with Mac devices)
- The student moves the mouse to an answer option.
- On the keyboard, the student selects the [Ctrl] key and selects the mouse button. The context menu will open.
- The student selects a tool to activate or open it.
Chromebook
- Using the trackpad, the student moves the mouse pointer to an answer option.
- The student presses and holds the [Alt] key on the keyboard.
- The student presses down on the trackpad until it “clicks.” The context menu will open.
- The student selects a tool to activate or open it.
Student Pause of Test
Students will take the following steps to pause a test:
-
Students are able to pause the test by selecting the [Pause] button in the global menu (figure 8).

Figure 8. [Pause] button in global menu of Student Testing Site
-
A confirmation message will appear like that shown in figure 9.
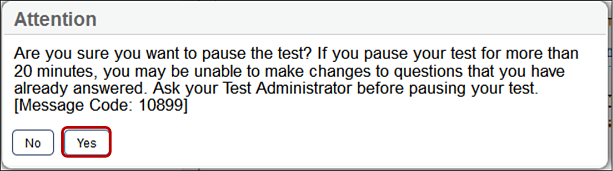
Figure 9. Student Pause test message
- The student selects the [Yes] button to acknowledge the message and pause the test. The student will be logged off and returned to the Sign In screen.
- If the student wishes to reenter the session, the student will need to sign on and proceed through the approval process again. If the session has been stopped, the student will need to obtain a new Session ID to resume testing.
Student Completion and Submission of the Test
After students answer the last item on the test, the [End Test] button will appear in the upper ‑left corner of the screen (figure 10). The top of the screen will also display the following message: “The test has been completed and is ready to be submitted when you are done reviewing your answers.”
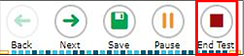
Figure 10. [End Test] button in the global menu of the Student Testing Interface
Students will take the following steps to end a test:
-
The student selects the [End Test] button (figure 10). An attention message will appear (figure 11).
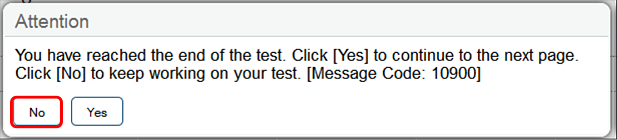
Figure 11. End Test alert message
- The student selects the [Yes] button to end the test and continue to the next screen. A student may want to select the [Yes] button if the student has answered all test questions and wants to review only items that have been flagged.
- If the student wants to continue working, the student should select the [No] button. The student may also want to select the [No] button if questions were left unanswered and the student would like to revisit those questions.
-
After the student selects the [Yes] button, a new screen presents the items in the test and identifies any items marked for review (figure 12).
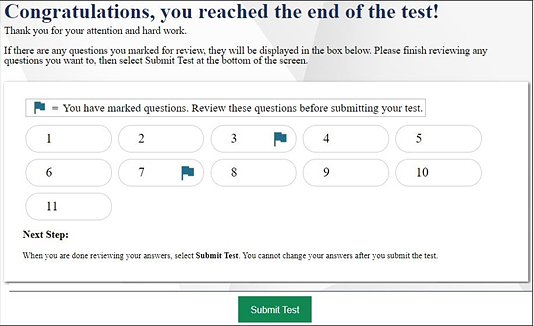
Figure 12. Review test questions
-
To go back to the test and review answers, the student must select an item from the list. The student is then taken back to the specific item in the test. The pause rule determines which items are available for review. Refer to the Student Pause of Test subsection to read more about pausing a student’s test.
- While the student is reviewing the answers, the [End Test] button (figure 10) will remain on the screen. To return to the screen where the student can review answers, the [End Test] button should be selected.
-
To complete the testing process, the student must select the [Submit Test] button (figure 12) and then selecting [Yes] in the final warning message (figure 13).
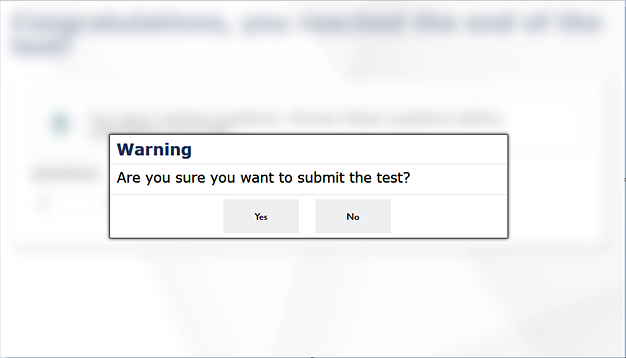
Figure 13. Test Submission warning message
-
After the student submits the test, the Test Summary confirmation screen (figure 14) that appears will show the student’s SSID, the test name, and the date the test was completed and submitted.
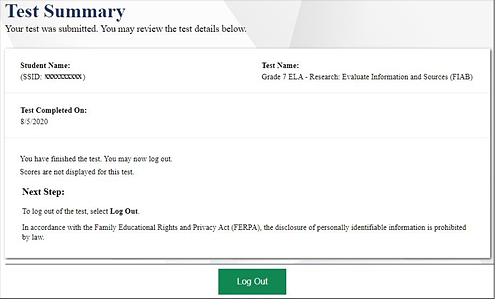
Figure 14. Test Summary confirmation screen