Home Page
When users log on to the California Educator Reporting System (CERS), the users are directed to the Home Page (figure 1). This page allows users to perform tasks permitted by their assigned TOMS role(s). For example, the Home Page for teachers with the Test Administrator role does not display the Administrator Tools or Search by School features. Tasks initiated on the CERS Home Page include searching for individual and group assessment results, and other features that vary by role like generating various reports and performing administrative tasks.
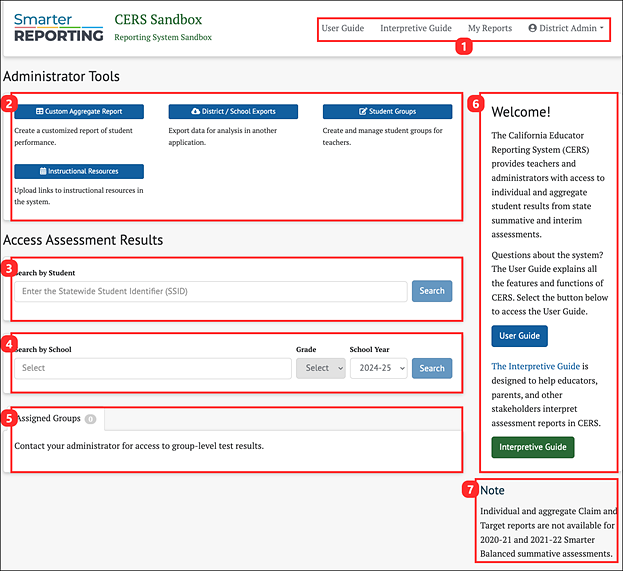
Figure 1. CERS Home Page for Users with an Administrator Role
The elements of the Home Page are:
- Header Bar: Includes links to the following:
- User Guide: This guide describes the features and functions in CERS.
- Interpretive Guide: This guide is designed to help educators understand and effectively use assessment results.
- My Reports: Allows access to all reports that the user has generated. Refer to the My Reports section for details.
- User Icon and name: Selecting the [
 ] icon allows the user to log out of the system.
- Administrator Tools: Perform administrative tasks and create reports for institutions and districts. Only those with administrator roles will see this section displayed.
- Custom Aggregate Report: Generate customized reports of student performance. Refer to the Custom Aggregate Reports in CERS section for details.
- District/School Exports: Export a CSV file of assessment results for one or more schools or districts. Refer to the District/School Exports section for details.
- Student Groups: Create and manage student groups for users. Refer to the Manage Student Groups section for details.
- District Resources: Upload local instructional resources in the system. Refer to the Creating a New Instructional Resource Link section for details.
- Search by Student: Search for assessment results for a specific student. Refer to the Search by Student section for details.
- Search by School: Search for assessment results for students for a specific school year and grade within a school. Refer to the Search by School section for details.
- Search by Group: View assessment results for a group of students that have been assigned to the user. Refer to the Assigned Groups and My Groups section for details.
- Welcome Side Bar: Describes User Guide and Interpretive Guide, including links to both.
- Note: Displays clarifying notes regarding system information or updates, if needed.