Initial ELPAC for Grades Three Through Twelve
Students Control the Web-based Student Testing Interface
For remote administration of the Initial ELPAC Listening, Reading, and Writing domains, students in grades three through twelve will log on to the web-based Student Testing Interface for testing. The test can be completed in an individual or multiple-student session.
Take the following steps to manage a remote session where one or more students will run the web-based Student Testing Interface on their devices:
- Access a copy of the appropriate DFA for grades three through twelve in TOMS, which includes additional information for remote administration.
- Log on to the Test Administrator Interface.
- Start or join a test session in the Test Administrator Interface.
- Select the Initial ELPAC in the Test Selection screen. Then, select the individual grade-span domain test(s) that corresponds to the actual grade level(s) of the student(s) being tested.
- Select the Remote or Hybrid radio button to create the URL that will be used to access the web-based Student Testing Interface. Then, select the [Start Operational Sessions] button.
- A Session Information box will pop up, providing the session ID and session link.
- Open a video meeting (Zoom, Teams, Google, etc.) with the student(s).
- Have all students—no more than four—turn on their web cameras and leave them on for the entire session so that TEs can see each student and the room immediately surrounding each student. Students may not use any of the background features to obscure a view of the room.
- Copy the session link URL from the Session Information pop-up box and share it with the student(s) via the chat feature in the video conferencing platform. Direct the student(s) to select the URL. A new web browser window should open to the web-based Student Testing Interface.
- Note that the copied link will have the session ID prepopulated. If the students need the session ID, it can be shared verbally or in the chat box of the video conferencing platform.
- Have students log on to the web-based Student Testing Interface using the students’ first names as they appear in TOMS, their SSIDs, and the session ID if the information is not filled in.
- Instruct the student(s) to confirm information in the Is this You? screen and select the appropriate domain test.
- In the Test Administrator Interface, a pop-up box appears that confirms access to the camera and microphone. For the Initial ELPAC only, TEs should skip this check by selecting the [X] in the upper corner. Then, access the student approvals by selecting the [Approvals] button and confirm the accessibility resources settings for each student. After, proceed with approving students to test.
- In the web-based Student Testing Interface, the Audio/Video Checks screen will appear. The student(s) will
- select the [Skip] button for the Camera Check,
- select the [Skip] button for the Recording Device Check,
- complete the Sound and Video Playback Check, and
- select the [Skip TTS Check] button for the Text-to-Speech Sound Check.
- Once the audio and video checks have been completed, the Instructions and Help screen will appear. Select the [Begin Test Now] button.
- Monitor the progression of each student through the assessment using the Test Administrator Interface.
- Monitor each student by watching the video feed, being alert for others in the room providing answers or an indication that a student might be using a device, such as a cell phone, out of sight of the web camera.
- At the end of the test session, confirm that each student has submitted or paused the assessment.
- Stop the session in the Test Administrator Interface by selecting the [Stop Session] stop sign icon.
- Log off the Test Administrator Interface.
- Log on to the THSS to score the Writing responses. (Refer to the Quick Start Instructions to Access the THSS.)
TE Controls the Web-based Student Testing Interface for the Reading, Listening, and Writing Domains
For grades three through twelve, TEs should control the web-based Student Testing Interface only with a student who has the designated support of DIA assigned. A student is tested one-on-one during this type of session.
Take the following steps to manage a remote session where the web-based Student Testing Interface will be run on the TE’s device:
- Access a copy of the appropriate DFA for grades three through twelve in TOMS:
- Log on to the Test Administrator Interface.
- Start or join a test session in the Test Administrator Interface.
- Select the Initial ELPAC in the Test Selection screen. Then, select the individual grade-level domain test(s) that corresponds to the actual grade level of the student being tested.
- Select the Remote or Hybrid radio button to create the URL that will be used to access the web-based Student Testing Interface. Then, select the [Start Operational Sessions] button.
- A Session Information box will pop up, providing the session ID and session link.
-
Copy the session link and paste the link in a new web browser window to open the web-based Student Testing Interface with the session ID already populated.
- In the Test Administrator Interface, a pop-up box appears that confirms access to the camera and microphone. For the Initial ELPAC only, TEs should skip this check by selecting the [X] in the upper corner.
- Open a video meeting (Zoom, Teams, Google, etc.) with the student.
- Have the student turn on a web camera and leave it on for the entire session for test monitoring.
- Sign in to the web-based Student Testing Interface using the student’s first name as it appears in TOMS, the student’s SSID, and the session ID if the information is not filled in.
- Confirm the student information that appears on the screen is correct by selecting the [Yes] button.
- Select the domain test to be administered.
-
In the Test Administrator Interface, access the student approvals by selecting the [Approvals] button and confirm the accessibility resources settings for the student.
- Share the web-based Student Testing Interface with the student. Be sure to select the option to share sound or audio or include sound within the video conferencing platform.
- In the web-based Student Testing Interface, the Audio/Video Checks screen will appear.
- For the Camera Check, select the [Skip] button. Then, scroll down to the next check.
- For the Recording Device Check, select the [Skip] button. Then, scroll down to the next check.
- Play the sound and video on the Sound and Video Playback Check and confirm whether the sound and video were able to be played by choosing the [I could play the sound and video] button.
- For the Text-to-Speech Sound Check, select the [Skip TTS Check] button.
- Once the audio and video checks have been complete, the Instructions and Help screen will appear. Then, select [Begin Test Now].
- Select the answer that matches the student’s response for the question in the Listening and Reading domains or type the student’s response for the Writing domain prompts. Repeat until the assessment is completed or up to the stopping marker noted in the DFA if the student has not provided any response or any correct response.
- Log off the web-based Student Testing Interface after completion of a domain. The TE will need to sign in the student information for every domain being administered. Repeat steps 5 through 10 if administering the other domain tests within the same test session.
- If testing is completed, stop the session in the Test Administrator Interface by selecting the [Stop Session] stop sign icon.
- Log off the Test Administrator Interface.
- TEs should log on to the THSS to score the Writing responses immediately after testing. (Refer to the Quick Start Instructions to Access the THSS.)
TE Controls the Web-based Student Testing Interface for the Speaking Domain
The Speaking domain should be administered one-on-one. Multiple students cannot be tested during this type of session.
Take the following steps to manage a remote session where the web-based Student Testing Interface will be run on the TE’s device:
- Access a copy of the appropriate DFA for grades three through twelve in TOMS, which includes additional information for remote administration.
- Log on to the Test Administrator Interface. TEs may also have the DEI open when administering the Speaking domain.
- Start or join a test session in the Test Administrator Interface.
- Select the Initial ELPAC in the Test Selection screen. Then, select the individual grade-level domain test(s) that corresponds to the actual grade level of the student being tested.
- Select the Remote or Hybrid radio button to create the URL that will be used to access the web-based Student Testing Interface. Then, select the [Start Operational Sessions] button.
- A Session Information box will pop up, providing the session ID and session link.
-
Copy the session link and paste the link in a new web browser window to open the web-based Student Testing Interface with the session ID already populated.
- In the Test Administrator Interface, a pop-up box appears that confirms access to the camera and microphone. For the Initial ELPAC only, TEs should skip this check by selecting the [X] in the upper corner.
- Open a video meeting (Zoom, Teams, Google, etc.) with the student.
- Have the student turn on a web camera and leave it on for the entire session so that the student and the room immediately surrounding the student can be seen.
- Sign in to the web-based Student Testing Interface using the student’s first name as it appears in TOMS, the student’s SSID, and the session ID if the information is not filled in.
- Confirm the student information that appears on the screen is correct by selecting the [Yes] button.
- Select the domain test to be administered.
- In the Test Administrator Interface, access the student approvals by selecting the [Approvals] button and confirm the accessibility resources settings for the student.
- Share the web-based Student Testing Interface with the student. Be sure to select the option to share sound or audio or include sound within the video conferencing platform.
-
In the web-based Student Testing Interface, the Audio/Video Checks screen (figure 1) will appear.
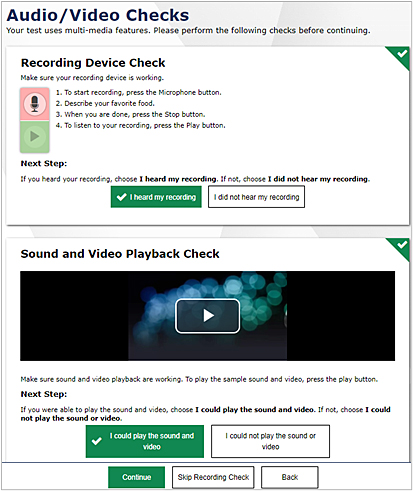
Figure 1. Audio/Video Checks screen in the web-based Student Testing Interface
- For the Camera Check, select the [Skip] button. Then, scroll down to the next check.
-
When administering the Speaking domain, follow the instructions on the screen for the Recording Device Check and have the student respond to the question using the microphone on the student’s device. Select [I heard my recording] if the recording was audible.
- Play the sound and video on the Sound and Video Playback Check and confirm whether the sound and video were able to be played by choosing the [I could play the sound and video] button.
- Once the audio and video checks have been completed, the Instructions and Help screen will appear. Then, select [Begin Test Now].
- Administer the Speaking questions according to the scripts in the in-person DFAs. Record the student's scores on the Student Score Sheet at the end of the DFA or directly in the DEI.
- At the end of the test session, select the [End Test] button to submit the test.
- Log off the web-based Student Testing Interface.
- Stop the session in the Test Administrator Interface by selecting the [Stop Session] stop sign icon.
- Log off the Test Administrator Interface.
- Log on to the DEI and enter the scores for the Speaking domain immediately after testing if the scores were noted on the score sheet during the live assessment.